
1. Textured Plaster Canvas Art
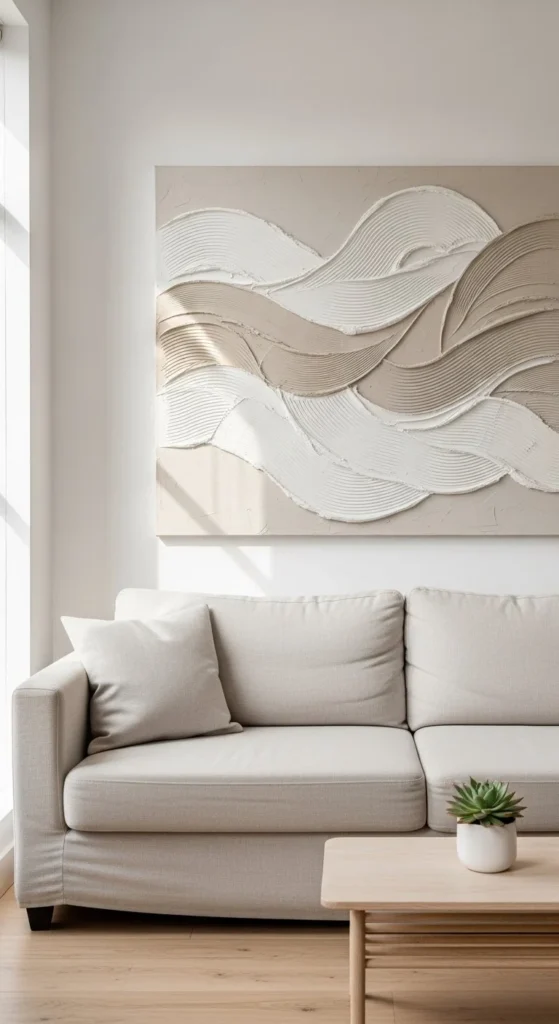
Textured plaster art has taken over modern DIY decor feeds. And for good reason. It looks gallery-made but costs very little. All you need is a joint compound, a canvas, and a spatula or putty knife. Spread the compound in sweeping or arched motions. Imperfection adds character. Let it dry fully before painting or sealing.
Stick to neutral tones for a calm, designer feel. Beige, ivory, and clay work beautifully. If you want contrast, try charcoal on white. Budget tip: buy joint compound in small tubs from hardware stores. One tub covers multiple canvases.
Hang a single oversized piece above a sofa. Or create a grid of smaller panels. Lighting matters. Side lighting enhances shadows and depth. This style suits minimalist, Scandinavian, and Japandi interiors. Even beginners can pull this off in a weekend.
2. Abstract Acrylic Spatula Painting
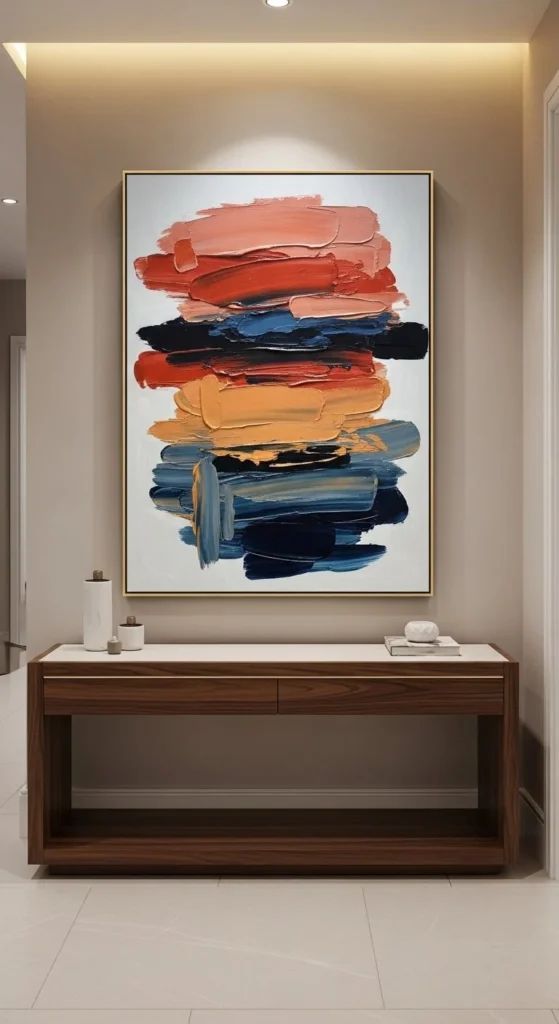
Abstract spatula art is beginner-friendly. No drawing skills required. Just color, motion, and layering. Use acrylic paints because they dry quickly and layer well. Start with a base color. Then add secondary tones using a palette knife.
Blend edges lightly. Don’t overmix. You want visible strokes. That’s where the visual interest lives. Try earth-tone palettes for warmth. Or monochrome schemes for modern homes.
Canvas boards are cheaper than stretched canvas. Great for practice. If paint costs add up, mix white into colors to extend coverage. Display above consoles, beds, or desks. Frames aren’t necessary.
This works well in contemporary and transitional spaces. Each piece becomes one-of-a-kind. Guests often assume it’s store-bought. That’s the fun part.
3. Geometric Washi Tape Wall Design
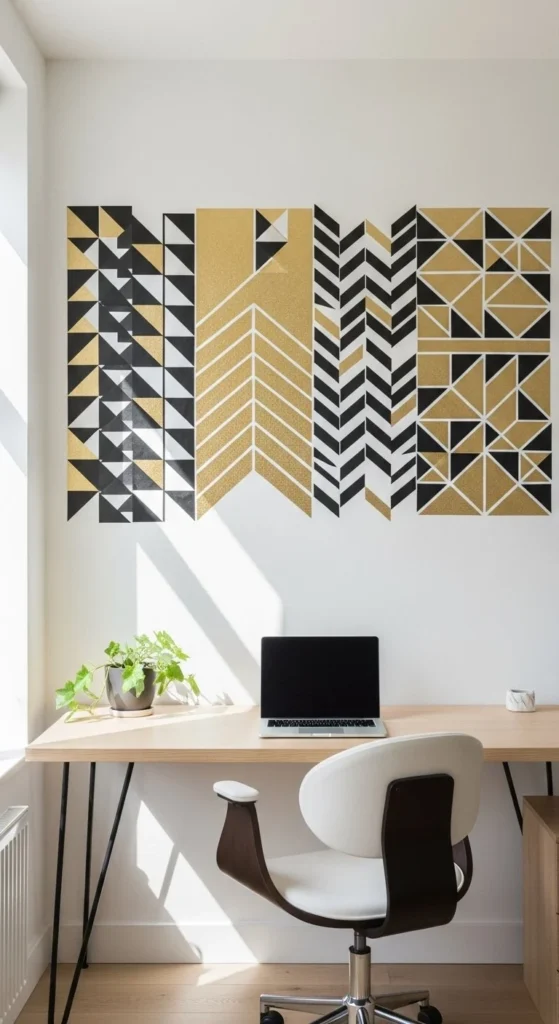
Washi tape wall art is renter-friendly. No nails. No paint. Just peel and stick. Start with a clean wall. Use painter’s tape as guides if needed. Popular layouts include triangles, grids, and herringbone patterns.
Metallic tapes add shine. Matte black creates graphic contrast. You can outline shapes or fill entire sections. The best part? It’s removable. Perfect for apartments or dorm rooms.
Use symmetry for a polished look. Measure spacing before sticking. Accent one wall instead of all four. This keeps the room balanced.
Costs stay low. A few tape rolls go far. Pair the wall with minimal furniture so the pattern stands out. Great for offices, study nooks, and kids’ rooms.
4. Boho Macrame Wall Hanging

Macrame brings softness to blank walls. Cotton cord, a dowel rod, and basic knots are all you need. Square knots and half-hitch knots form most patterns. Beginners can follow simple online knot charts.
Stick to neutral fiber tones for a calming effect. Ivory and sand shades blend easily with most interiors. Want contrast? Try dip-dyed ends in rust or ochre.
Macrame suits boho, coastal, and earthy spaces. Hang above beds, cribs, or reading chairs. You can even add wooden beads or feathers for detail.
Budget tip: buy cord in bulk spools. One spool makes multiple hangings. This project takes patience but no expensive tools. The texture alone fills visual space beautifully.
5. Gold Leaf Minimal Canvas
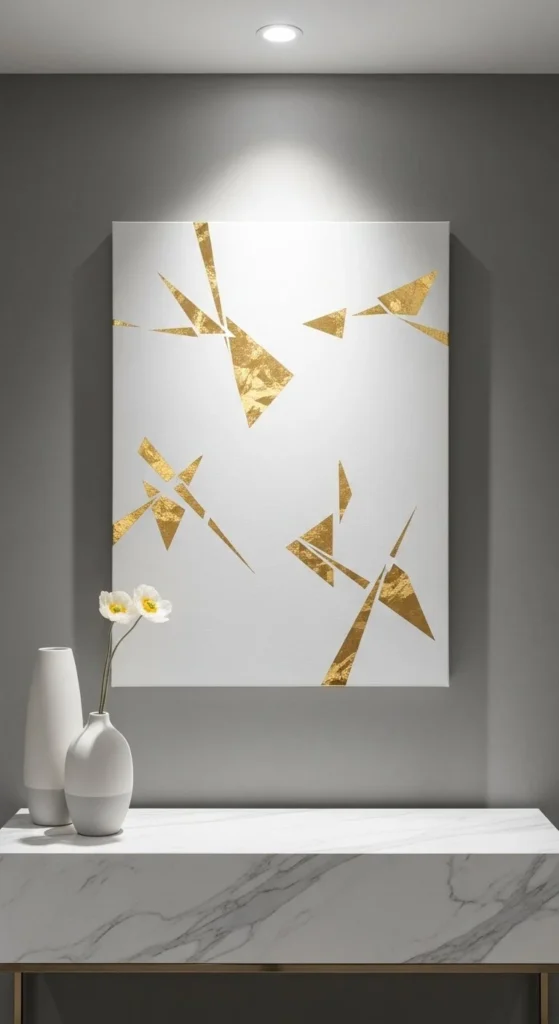
Gold leaf turns simple art into statement decor. Start with a painted or plain canvas. Apply adhesive where you want metallic accents. Then press gold leaf sheets gently onto the tacky surface.
Peel excess away with a soft brush. Seal with varnish to prevent flaking. The result feels luxurious but costs far less than store art.
Use geometric placements for modern homes. Or free-form cracks for organic style. Pair with black, navy, or blush backdrops for contrast.
Entryways and dining rooms benefit most from metallic shine. Light reflects off the leaf, adding dimension. Even small canvases feel upscale with this technique.
6. Yarn String Art Shapes

String art mixes craft and structure. It starts with a wooden base, small nails, and colored yarn. Sketch your shape first. Hearts, initials, stars, and geometrics all work well. Hammer nails along the outline, keeping spacing even. Then wrap yarn across the nails in layered directions.
The overlapping threads create depth. That’s where the visual magic happens. Use high-contrast yarn colors against darker wood for clarity. Or stay tonal for a softer look.
Budget trick: repurpose scrap plywood or old shelves. Embroidery thread works if yarn feels bulky. This style fits bedrooms, craft rooms, and gallery walls. It adds handmade charm without needing paint skills.
Try metallic thread for subtle shimmer. Or gradient yarn for color transitions. Even small boards make strong accents when grouped together.
7. Driftwood Natural Wall Sculpture
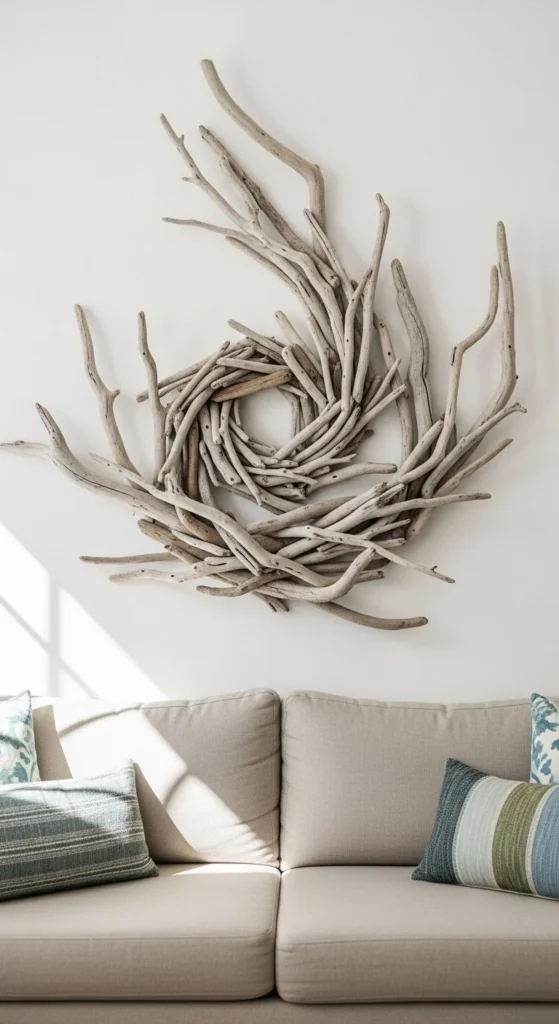
Nature makes the best wall decor. Driftwood pieces bring organic texture indoors. Collect branches from beaches, riverbanks, or forests. Clean and dry them thoroughly before use.
Arrange pieces on the floor first. Test shapes before mounting. You can form animals, abstracts, or sunburst layouts. Attach using wood glue or hidden screws.
Leave wood raw for authenticity. Or whitewash lightly for coastal interiors. This works beautifully in rustic and coastal homes.
Large pieces fill wide walls without feeling heavy. Pair with woven rugs or jute accents. Cost stays near zero if materials are foraged. Every sculpture becomes one-of-a-kind.
Lighting tip: angle spotlights to cast branch shadows. It doubles the visual impact.
8. Color Block Painted Panels
Color blocking is clean and graphic. Perfect for modern interiors. Use painter’s tape to section your canvas. Then fill each block with acrylic paint.
Stick to 3–4 colors max. Too many shades feel chaotic. Earth tones create warmth. Pastels soften rooms. Monochrome schemes feel architectural.
Peel tape while paint is slightly wet. This prevents cracking edges. Use matte paint finishes for a contemporary look.
Canvas boards keep costs down. You can also paint directly on MDF panels. Hang panels in triptychs for balance. Dining rooms and hallways benefit most from bold geometry.
This project is fast. Many finish within an hour. Great for last-minute wall updates.
9. Fabric Wrapped Wall Panels

Fabric panels double as art and texture. Start with canvas frames or foam boards. Stretch fabric tightly across the surface. Staple or glue at the back.
Linen, cotton prints, and block patterns work beautifully. You can even repurpose curtains or scarves. This keeps costs low.
Mix patterns carefully. Keep one dominant color to unify the set. Botanical prints feel relaxed. Geometrics feel structured.
Use padded batting underneath if you want softness and sound absorption. Great for bedrooms and offices.
Panels are lightweight. Easy to hang with adhesive strips. Swap fabrics seasonally if you like refreshing decor often.
10. Paper Flower Wall Installation
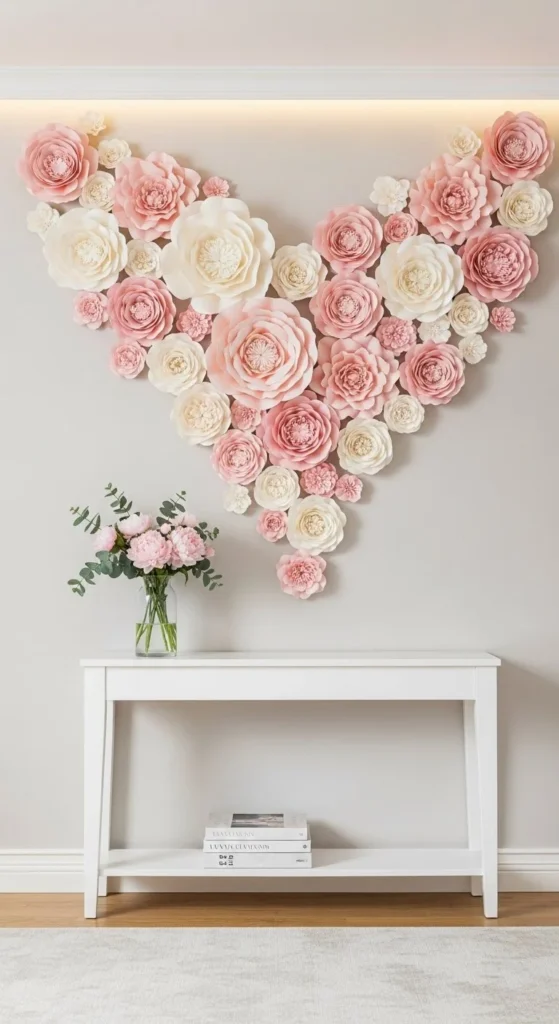
Paper flower walls feel sculptural. They add depth without heavy materials. Use cardstock or crepe paper. Cut petal layers in graduating sizes. Curl edges with scissors for realism.
Hot glue petals into full blooms. Then mount using removable hooks or foam tape. Cluster flowers in corners or create full backdrops.
Stick to soft tonal palettes for elegance. Or go vibrant for kids’ rooms and party spaces. This decor works well above console
11. Wood Shim Chevron Wall Art
Wood shims create instant dimension. These thin wedge-shaped pieces are inexpensive and easy to cut. Arrange them in chevron or herringbone layouts on a plywood base. Wood glue holds them securely.
Alternate stain shades for contrast. Walnut and oak pair beautifully. Or keep all pieces natural for a softer farmhouse look. The layered angles catch light throughout the day.
Use pre-cut shims to save time. No power tools required. This project suits rustic, farmhouse, and cabin interiors.
Hang above dining tables or mantels. The repeating pattern fills wide walls without artwork frames. Seal the wood to prevent splinters and enhance grain visibility.
It looks complex but is beginner-manageable with patience.
12. Crayon Melt Drip Canvas
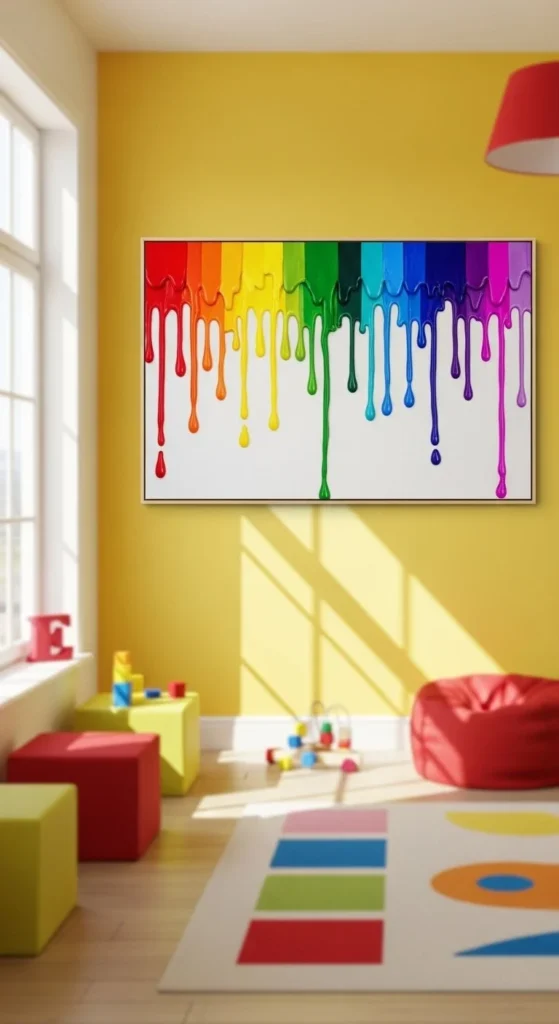
Crayon melt art is bold and expressive. Glue crayons along the top edge of a canvas. Use a hairdryer to melt wax slowly. The colors drip downward in organic streaks.
Angle the canvas to guide flow direction. Layer similar shades together for gradient effects. Or go full rainbow for drama.
This project is perfect for kid-friendly spaces. It’s messy but fun. Protect surfaces with plastic sheets.
Use old crayons to save money. Thrift stores often sell mixed packs cheaply. Once cooled, seal lightly with clear spray.
Hang in playrooms, craft corners, or nurseries. It adds color instantly without paint mixing skills.
13. Stenciled Metallic Wall Canvas
Stenciling creates precision without freehand painting. Secure your stencil over a painted canvas. Dab metallic paint lightly using a sponge or stencil brush.
Pearl, champagne, and antique gold shades work well. Dark base colors enhance metallic shine. Navy and charcoal are especially striking.
Use low-paint dabbing to avoid bleeding edges. Lift stencil slowly while paint is wet.
This technique suits glam, Moroccan, and transitional interiors. Create single panels or symmetrical pairs. Hallways and entryways benefit from reflective finishes.
Reusable stencils keep long-term costs low. Clean immediately after use to preserve pattern detail.
14. Engineering Print Photo Wall
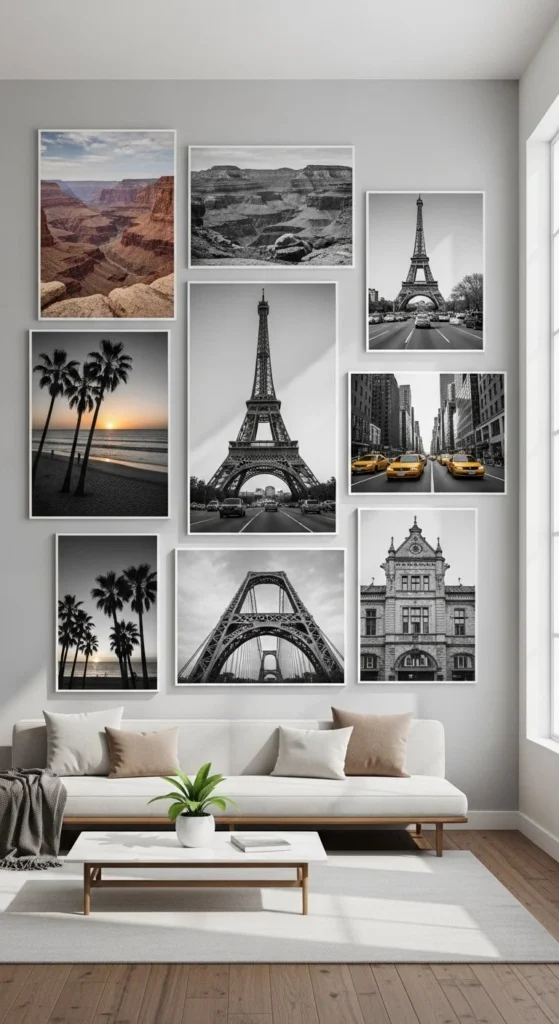
Engineering prints scale photos affordably. Office supply stores print large black-and-white images for low cost. Choose travel photos, cityscapes, or portraits.
Mount prints on foam boards for stability. Or clip them onto wire grids. The monochrome look feels cohesive even with mixed subjects.
This is ideal for gallery wall lovers on a budget. Large visuals fill space quickly. Minimal framing required.
Living rooms, stairways, and offices suit this style. You can swap prints seasonally. Matte finishes prevent glare.
For warmth, mix prints with small framed pieces or plants nearby.
15. Wire Shape Wall Sculptures
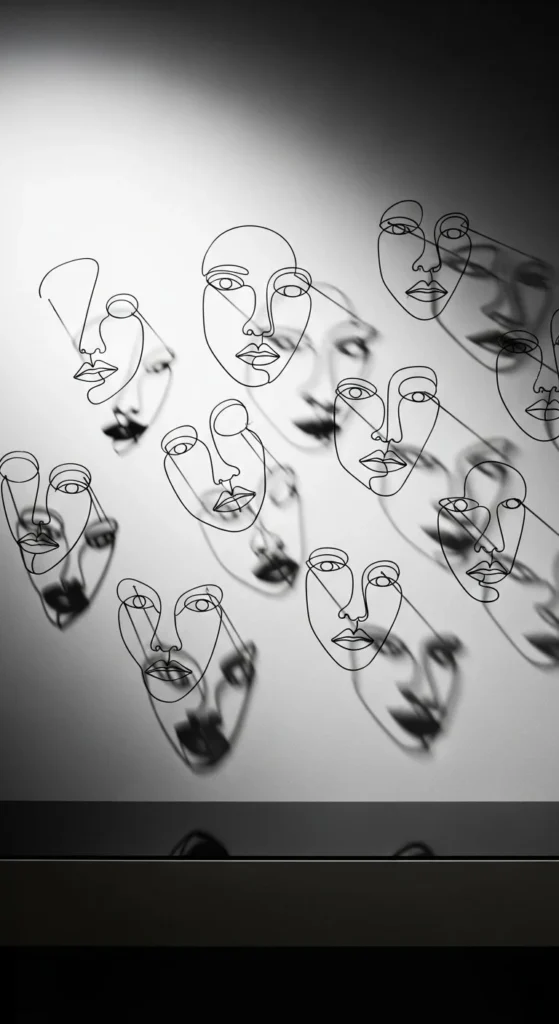
Wire art feels like drawing in air. Use craft wire or aluminum rods. Bend into shapes like faces, hands, or geometrics. Pliers help with clean curves.
Mount using clear hooks or small nails. Shadows become part of the artwork. That’s the beauty of this medium.
Choose black matte wire for bold outlines. Gold wire adds elegance. Keep walls light for contrast.
This decor suits modern, minimalist, and studio spaces. Lightweight and inexpensive to make. One wire roll creates multiple pieces.
Pair with sculptural vases or books below for a gallery effect.
16. Burlap Stencil Farmhouse Canvas
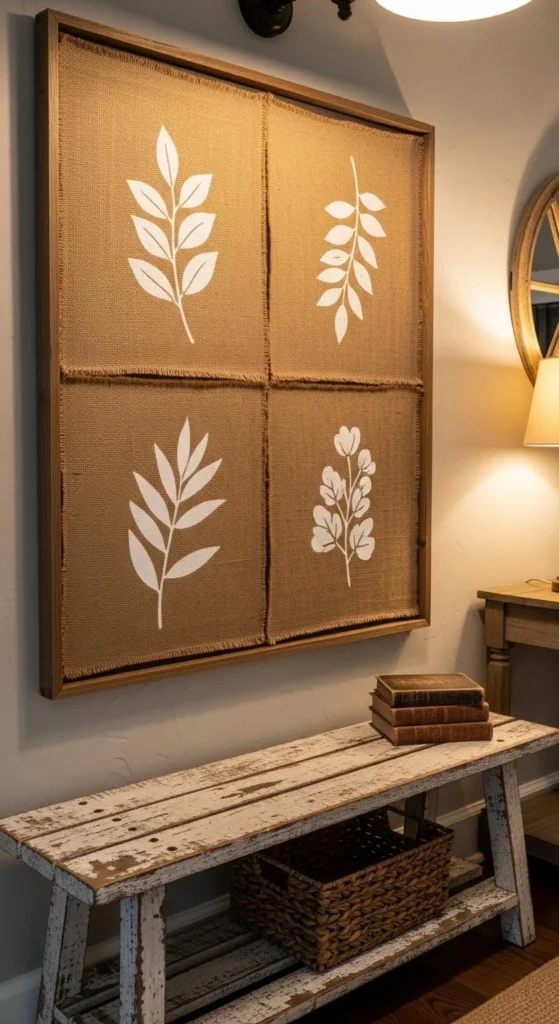
Burlap canvas art brings raw texture to walls. Stretch burlap fabric over a wooden frame or staple it onto plywood. The woven surface instantly adds depth.
Use stencils for clean motifs. Botanical leaves, grain sacks, or vintage typography all work well. Dab paint lightly so it doesn’t bleed into the fibers.
Stick to white or charcoal paint for farmhouse contrast. You can lightly fray edges for extra character.
This piece suits entryways, kitchens, and mudrooms. Pair with galvanized metal decor or wooden hooks. Costs stay low since burlap is inexpensive by the yard.
Seal lightly if you want durability without stiffening the fabric too much.
17. Dreamcatcher Boho Wall Decor
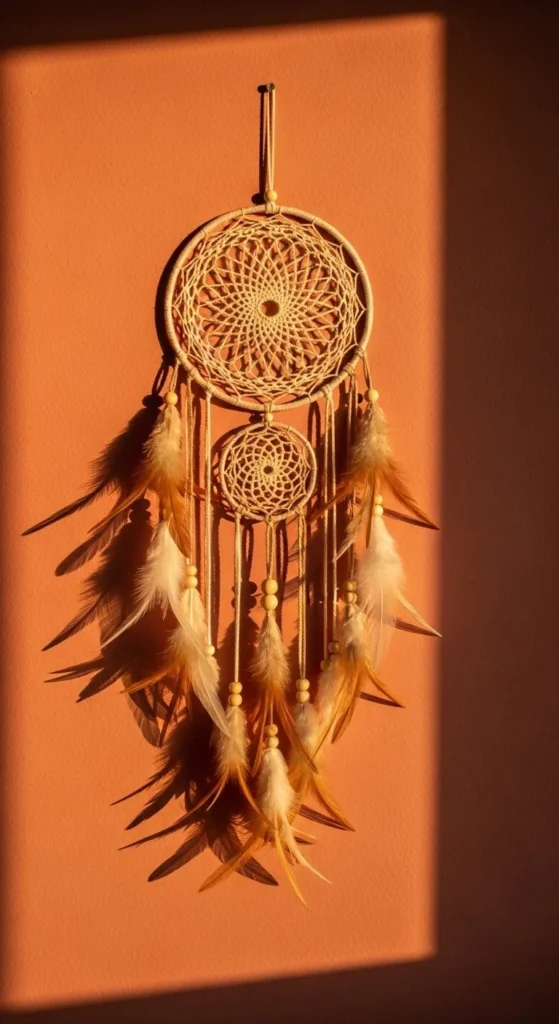
Dreamcatchers combine craft and symbolism. Start with a metal or wooden hoop. Wrap it in suede cord or yarn. Then weave the inner web using string or thread.
Add feathers, beads, or tassels below. Neutral palettes feel calming. Earth tones pair beautifully with boho interiors.
Use layered hoop sizes for fuller wall coverage. Hang above beds or reading corners. They move gently with airflow, adding softness.
Budget tip: repurpose embroidery hoops. Feathers can be faux if you prefer ethical materials.
Cluster multiple dreamcatchers for a statement wall. Works well in bedrooms and meditation spaces.
18. Pegboard Functional Art Wall
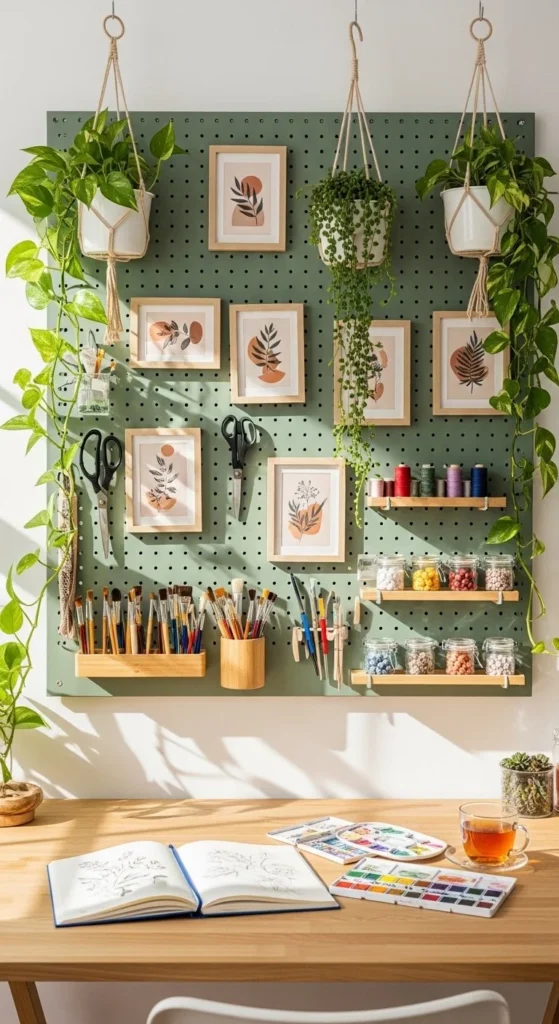
Pegboards aren’t just storage. They double as wall art. Paint the board to match your room palette. Sage, blush, and charcoal are popular choices.
Arrange pegs to hold plants, prints, or baskets. The layout becomes part of the visual design. Rotate items seasonally for variety.
This works especially well in home offices and craft rooms. It keeps tools accessible while decorating the wall.
Budget-friendly boards are available at hardware stores. Frames and hooks clip in easily. Add fairy lights or mini shelves for dimension.
Functional decor like this keeps walls active without clutter.
19. Potato Stamp Pattern Canvas
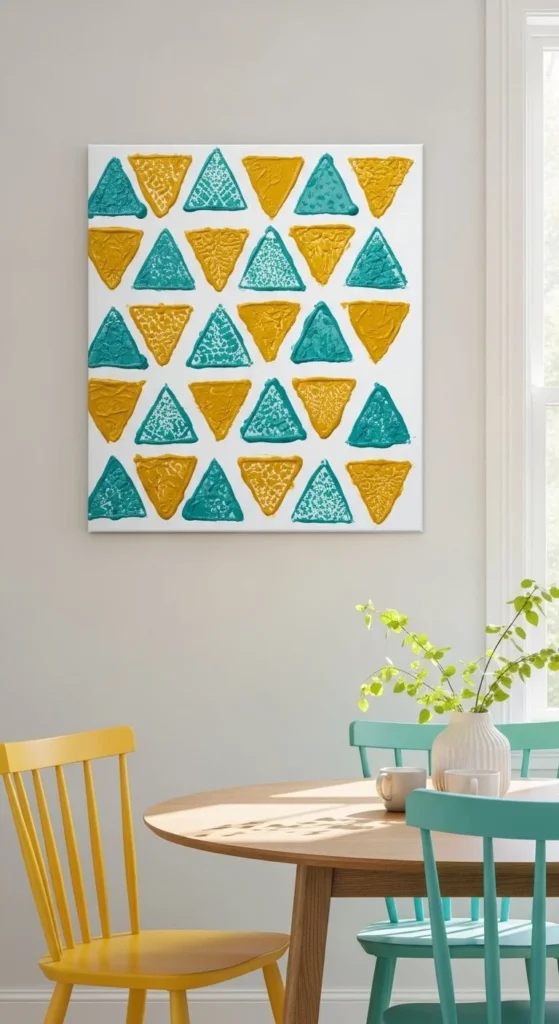
Potato stamping is simple but striking. Cut potatoes in half. Carve shapes like triangles, circles, or diamonds. Dip into acrylic paint and press onto canvas.
Repeat patterns evenly. Or create organic scattered layouts. The hand-stamped texture adds charm.
Use contrasting color pairs for clarity. Mustard and teal. Black and blush. Navy and white.
This project is affordable and kid-friendly. Great for kitchens, laundry rooms, or casual dining spaces. Seal the canvas after drying.
You can also stamp directly onto fabric panels or paper prints.
20. Minimalist Canvas Silhouette Cutouts

Silhouette cutout art feels clean and sculptural. Trace shapes onto canvas or MDF boards. Human profiles, leaves, or arches work beautifully.
Cut carefully using craft knives. Paint each layer in tonal shades. Then mount slightly offset for depth shadows.
Stick to earth-tone palettes for modern interiors. Clay, sand, and taupe feel calming.
Hallways and staircases benefit from this vertical art style. It fills narrow walls without visual heaviness.
Budget tip: use foam boards instead of canvas. Lightweight and easier to cut. Layering creates dimension without complex materials.
Minimal effort. Strong architectural impact.
21. Textured Mud & Emulsion Abstract Art
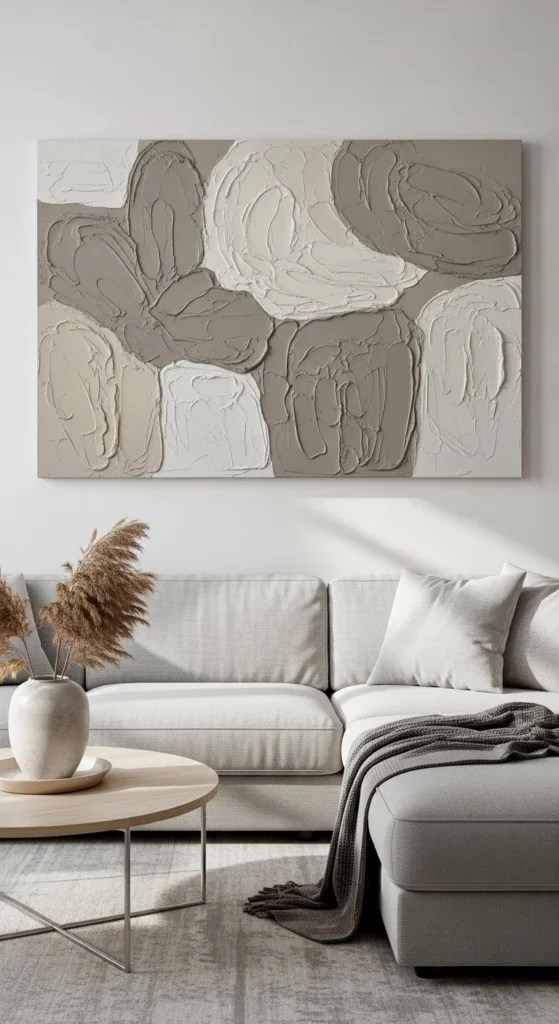
This project turns leftover wall paint into statement art. Mix wall filler or texture paste onto canvas using trowels or spatulas. Build ridges, waves, or arched forms. Let it dry fully before painting.
Use leftover emulsion paint for color. It spreads smoothly over textured surfaces. Stick to soft neutral palettes for a gallery-inspired look.
This method keeps costs extremely low. Most materials are already at home. It suits large canvases best because texture becomes more visible at scale.
Hang above sofas or beds where light hits sideways. Shadows enhance the relief patterns. Seal with matte varnish for durability without shine.
A practical way to reuse renovation materials creatively.
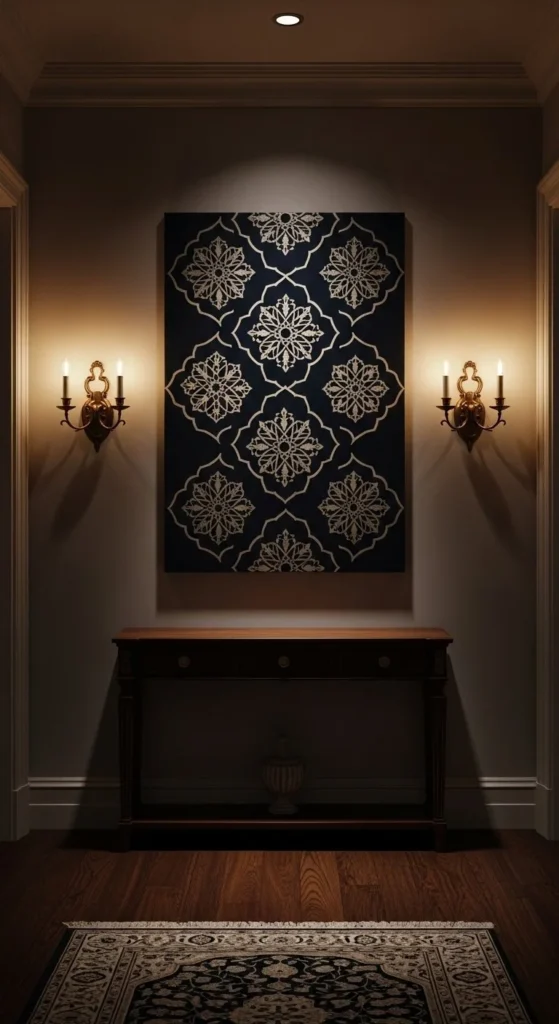
22. Islamic Geometric Stencil Canvas
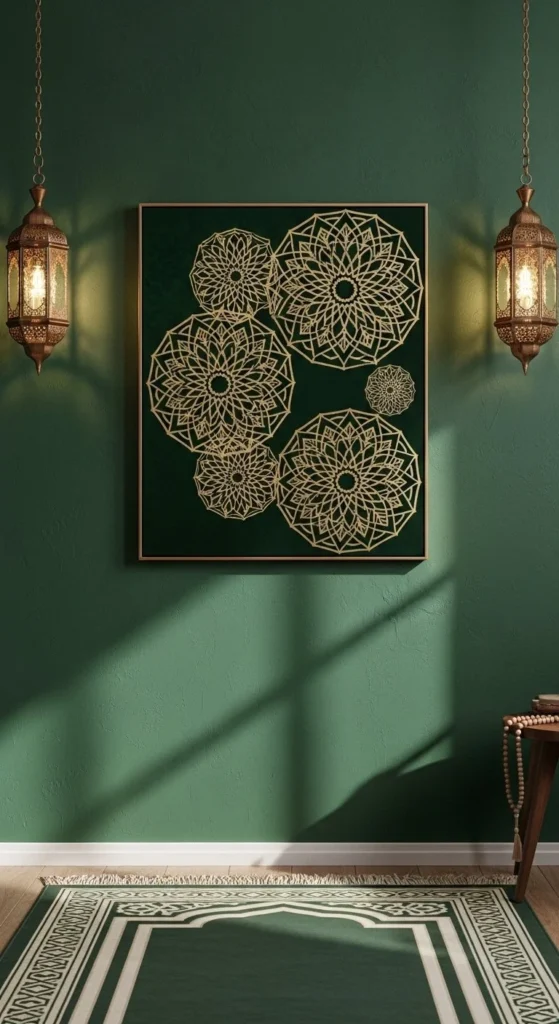
Islamic geometric art brings symmetry and heritage into decor. Use reusable mandala stencils on painted canvas. Deep jewel tones work beautifully as bases.
Emerald, navy, and burgundy enhance metallic overlays. Dab gold or brass paint gently for crisp pattern edges.
This style suits spiritual corners and entryways. It adds cultural identity without overpowering the room.
Budget tip: repeat one stencil across multiple canvases to create a cohesive wall set. Frame in dark wood for contrast.
Soft lantern lighting highlights metallic shimmer. The result feels both decorative and meaningful.
23. Faux 3D Wood Butterfly Wall Art
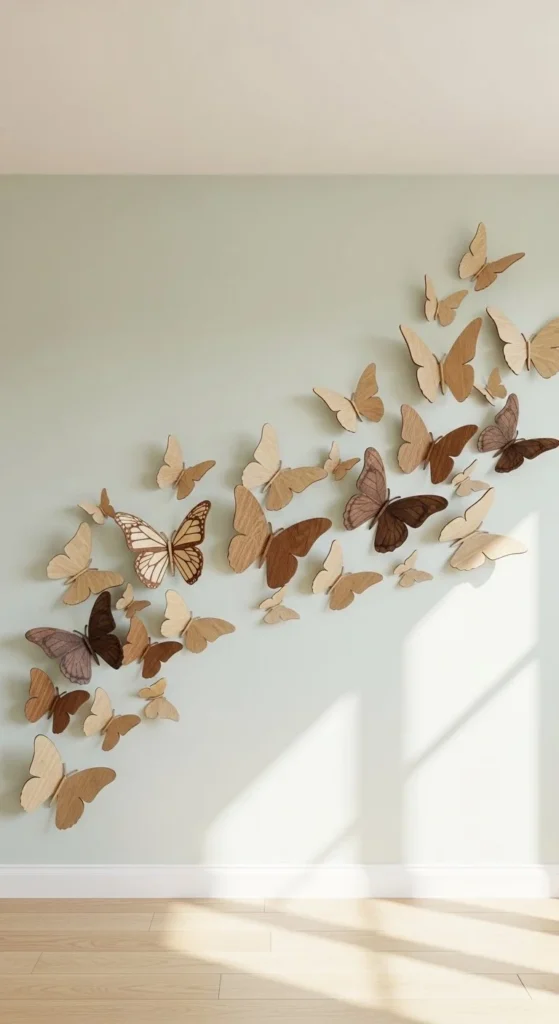
3D butterfly walls feel airy and sculptural. Use thin plywood or MDF cutouts shaped like butterflies. Print textures or hand-paint wing details.
Mount using foam tape so wings lift slightly from the wall. This creates shadow depth. Arrange butterflies in swirling flight paths.
Stick to natural wood finishes for elegance. Or paint in ombré tones for playful rooms.
Great for nurseries, reading nooks, or feminine interiors. Lightweight pieces are easy to reposition.
You can scale installations across entire walls or keep them clustered above furniture.
24. Paper Pinwheel Motion Wall
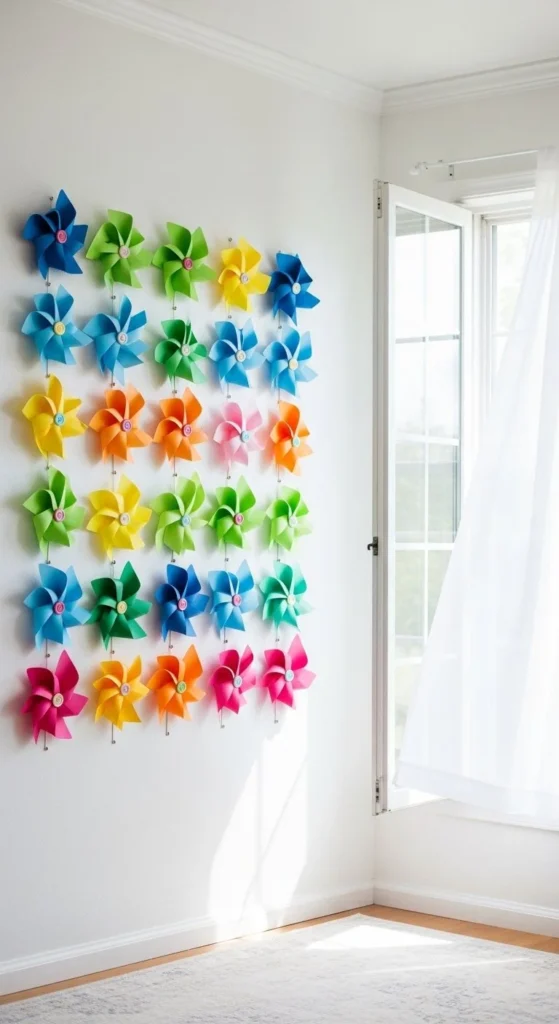
Paper pinwheels bring movement into decor. Fold patterned scrapbook paper into pinwheel shapes. Secure with brads or pins.
Mount them onto canvases or directly onto walls. Airflow makes them spin lightly. That subtle motion adds life to the room.
Use coordinated color schemes instead of random prints for cohesion. Pastels suit nurseries. Bright tones suit playrooms.
This project is low-cost and fast to assemble. Ideal for temporary decor or party backdrops.
You can also cluster pinwheels into wreath shapes for seasonal walls.
25. Layered Arch Painted Canvas
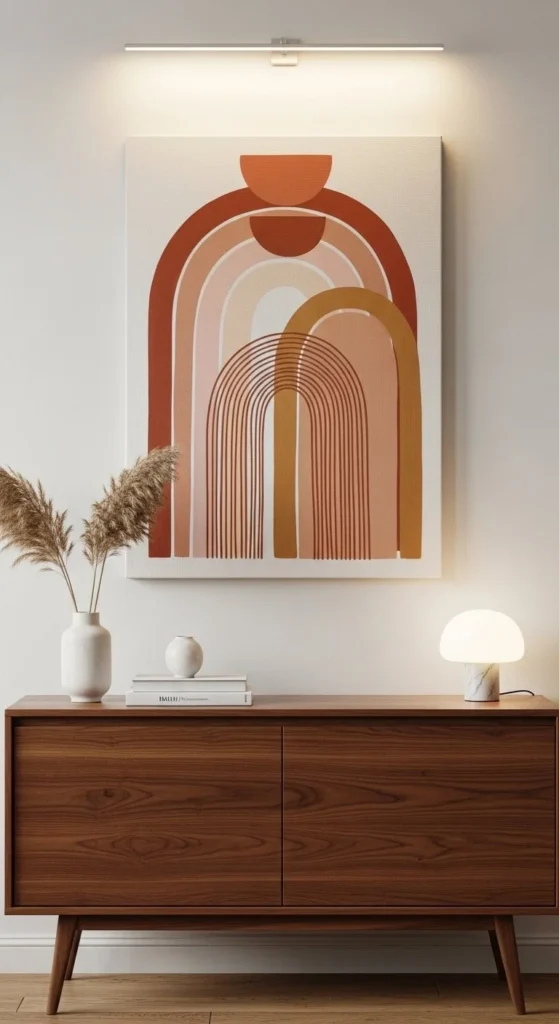
Layered arches feel architectural yet soft. Sketch arch shapes lightly in pencil. Paint overlapping forms using tonal colors.
Let each layer dry before adding the next. Slightly offset shapes create depth illusion. Matte acrylics work best.
Stick to desert-inspired palettes like clay, rust, and sand. These tones feel grounded and calming.
This style fits modern, boho, and mid-century interiors. Hang above consoles, dressers, or desks.
Use painter’s tape if you want crisp edges. Or freehand for organic softness. Even beginners achieve polished results quickly.
26. Framed Wallpaper Panel Art
Wallpaper isn’t limited to walls. Framing it turns patterns into art. Choose sample rolls or leftover sheets. Botanical prints, damask, and chinoiserie designs work beautifully.
Cut panels to fit large frames. Or mount directly onto foam boards for a frameless look. Symmetry keeps the display balanced.
This works well in traditional and transitional interiors. Dining rooms and hallways benefit most from patterned panels.
Budget tip: wallpaper sample books often sell cheaply. One book can create multiple artworks.
Pair with brass frames or wooden ones depending on your room tone. The result feels curated without custom art pricing.
27. Shadow Box Memory Wall Art
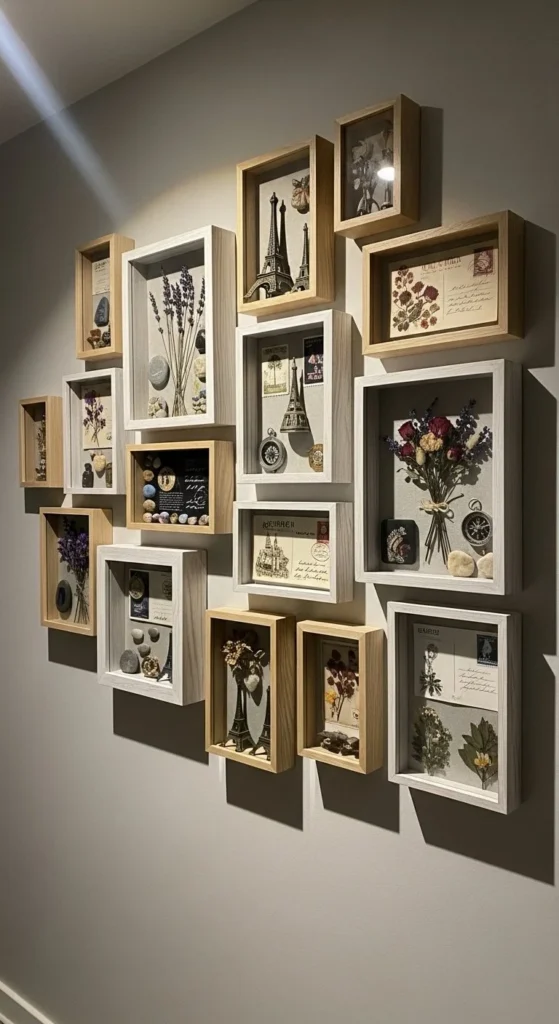
Shadow boxes turn memories into decor. Use deep frames to display keepsakes like shells, tickets, or pressed flowers. Layer items for depth.
Arrange multiple boxes into gallery layouts. Keep background colors neutral so objects stand out.
This style adds personal storytelling to walls. Ideal for hallways and staircases where guests pause to look.
Budget option: thrifted frames work perfectly. Paint them to match if needed.
You can theme each box — travel, family, nature. Soft spotlights enhance dimensional shadows inside the frames.
A meaningful alternative to traditional art prints.

Leave a Reply