
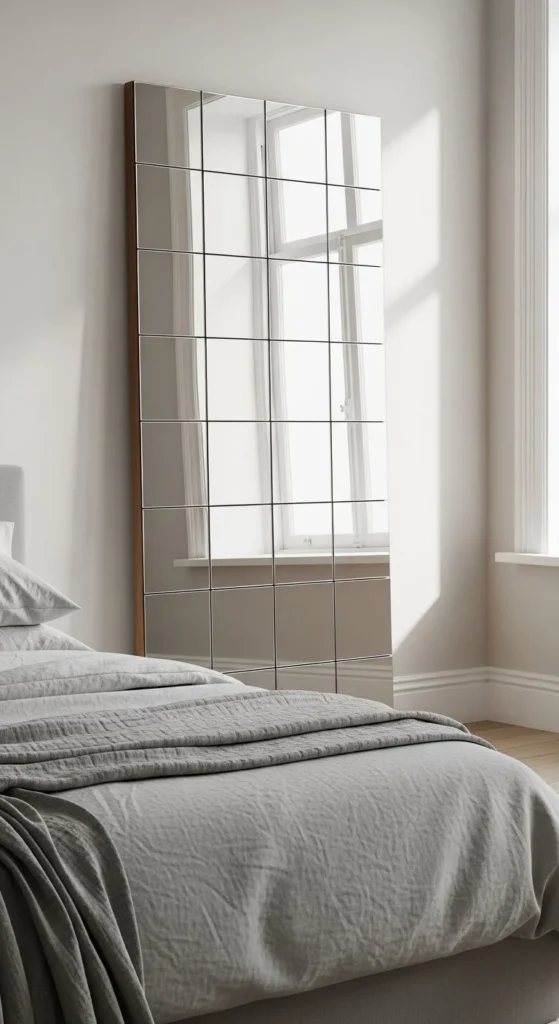
1. Beveled Mirror Grid Wall Art
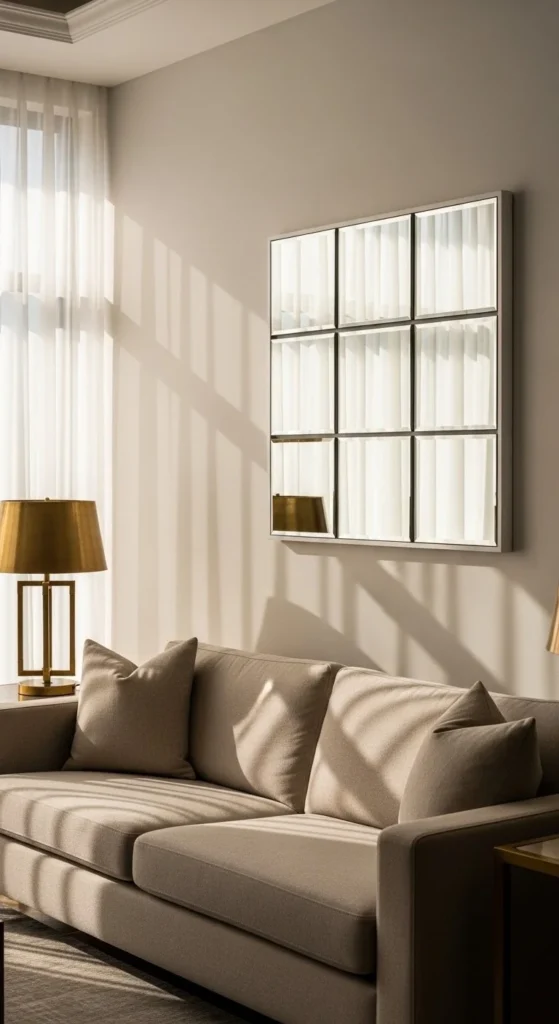
This project shows why Dollar Tree mirrors dominate glam DIY feeds. A simple grid layout reads polished the moment those beveled edges catch light. Start with nine identical mirrors and dry-fit them on foam board or tempered hardboard. Use a ruler and level before gluing. Alignment is what sells the look. Hot glue works for speed, but Gorilla Glue or Fix-All holds better over time, especially for heavier builds. Once mounted, paint the outer edge in black, gold, or chrome for a framed effect without buying one.
Budget trick: white foam board keeps costs under control, while thin hardboard allows larger scale pieces. Style it above a console or sofa where reflections bounce light around the room. Keep the surrounding decor simple. One sculptural vase. One book stack. Let the mirrors do the talking. High-end looking wall art often comes down to repetition and spacing, not expensive materials. This one photographs beautifully for Pinterest pins and performs well in rental spaces using sawtooth hangers or Command strips rated for weight.
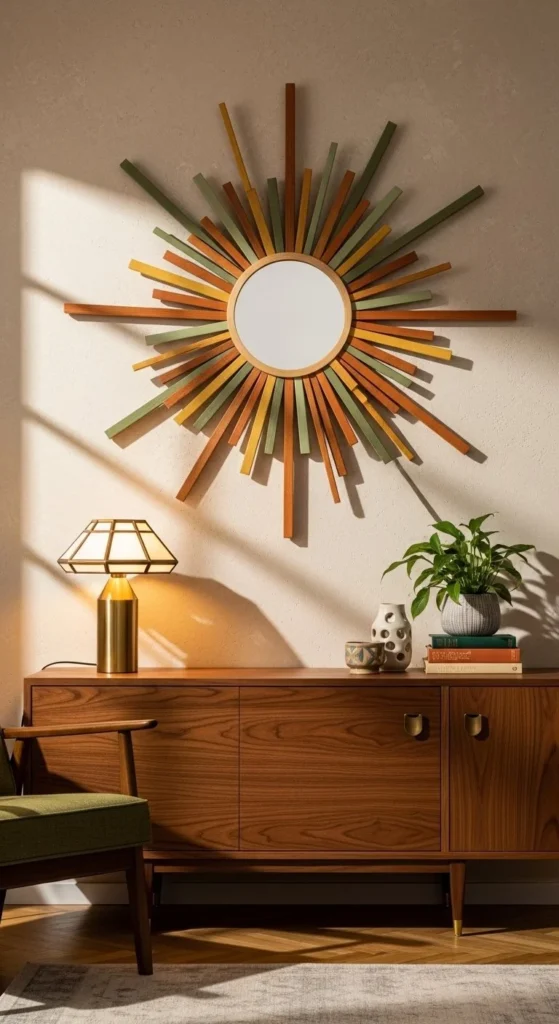
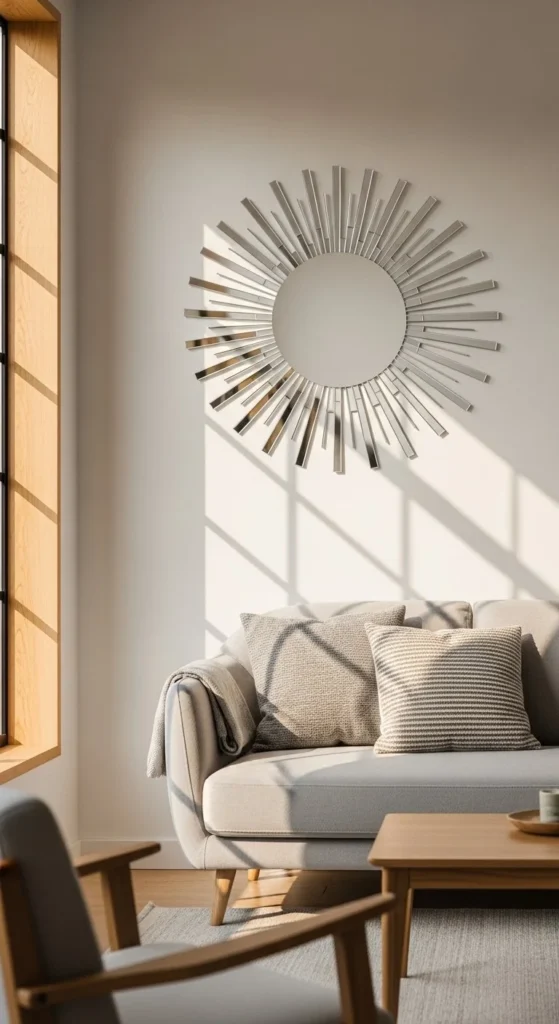
2. Sunburst Spoon Mirror
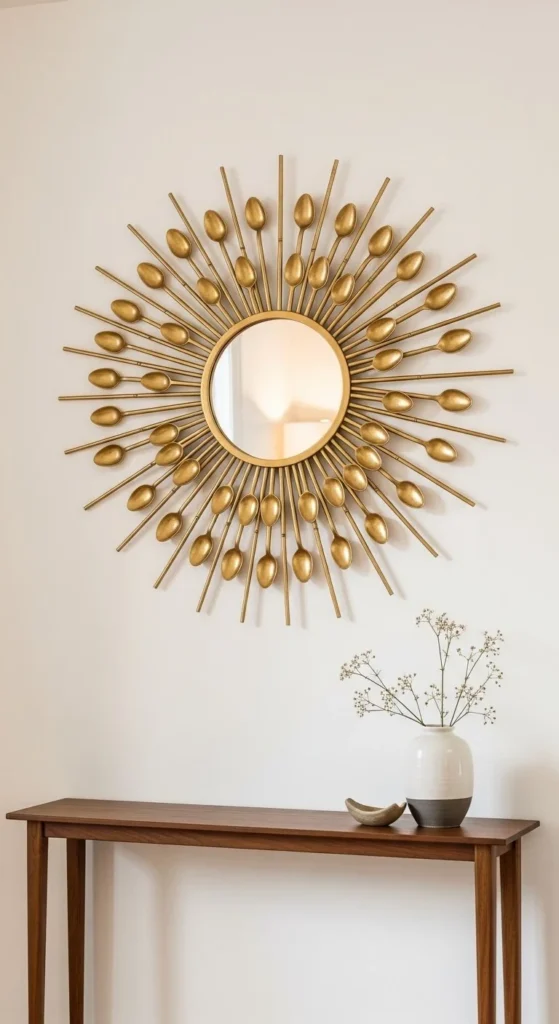
Sunburst mirrors keep trending because they signal drama without clutter. Dollar Tree spoons turn into sculptural rays once spray painted in gold, champagne, or matte black. Cut handles, fan them evenly, and glue them around a round mirror base. Work in sections to keep spacing consistent. A cardboard or foam board backing helps hold the shape while drying.
Styling trick: slightly overlap spoon bowls for depth. That layered look mimics boutique decor. For durability, switch from hot glue to construction adhesive once placement is locked in. Hang it in an entryway or powder room where light hits from the side. Shadows make the rays pop.
If spoons sell out, Jenga blocks or paint stirrers create a sharper profile. Keep the wall color neutral so the mirror reads bold, not busy. Modern glam thrives on contrast. This project delivers shine and structure while staying budget-friendly. It also works as a holiday craft with seasonal paint colors swapped in later.
3. Antique-Style Window Pane Mirror
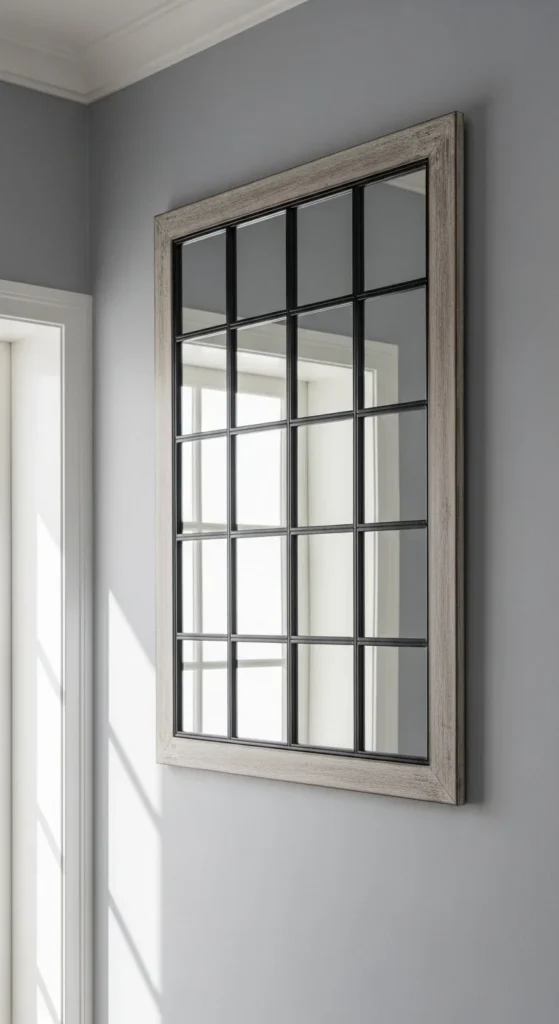
This design borrows from vintage windows seen in old lofts and farmhouses. Use small square mirror tiles in a tight grid. Once mounted, add thin trim or paint lines to mimic window panes. Black or dark bronze reads classic. White feels coastal. Precision matters here. Measure twice. Tape guidelines before painting.
Foam board works for smaller sizes. For anything over 24 inches, hardboard holds straighter. Use a level during mounting so grout lines stay crisp. The finished piece adds reflection without screaming “mirror.” That restraint gives it stunning wall decor energy.
Place it in narrow hallways or dining rooms where real windows are limited. Pair it with textured elements like linen runners or wood furniture. This contrast keeps the look grounded. The project scales easily, making it great for gallery wall series content or step-by-step tutorials that perform well on YouTube and Pinterest.
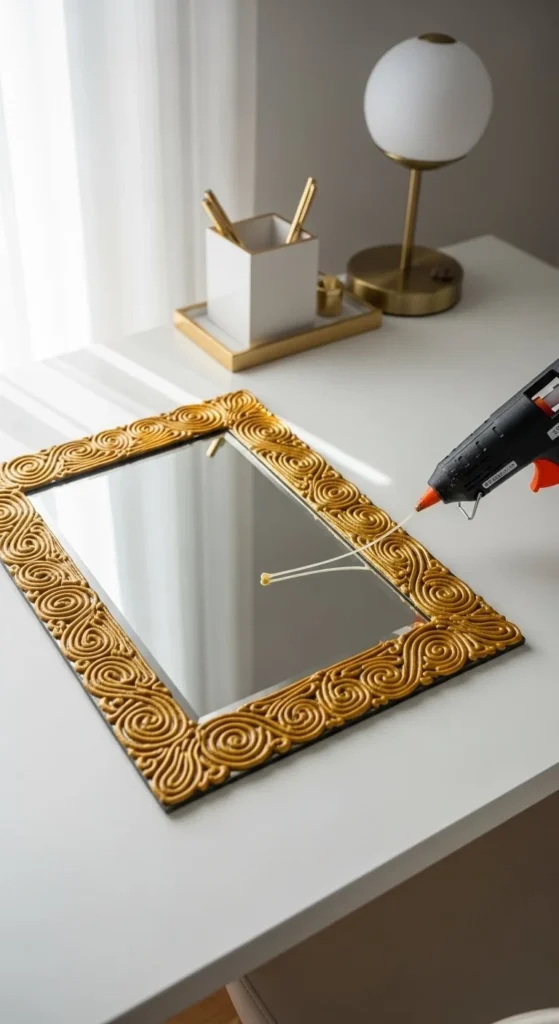
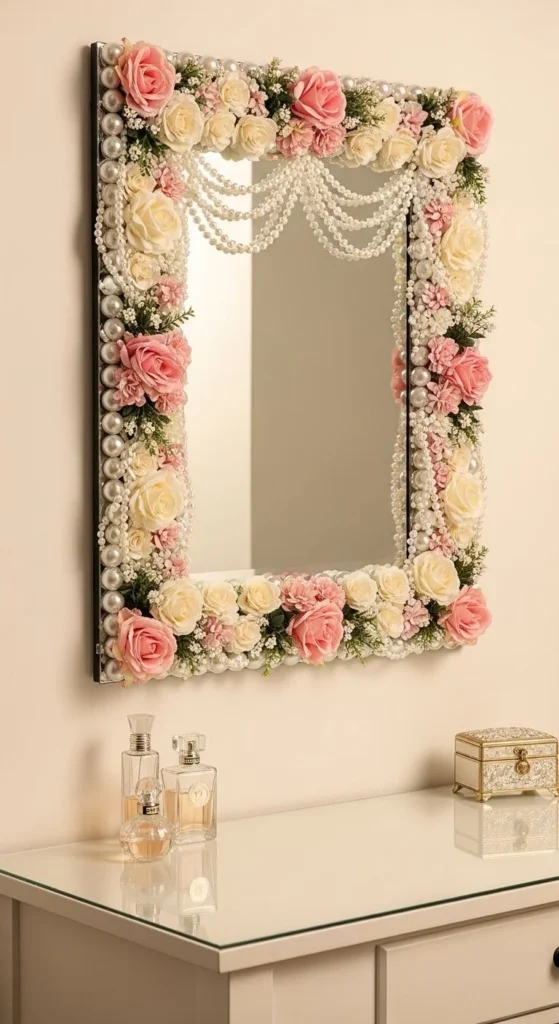
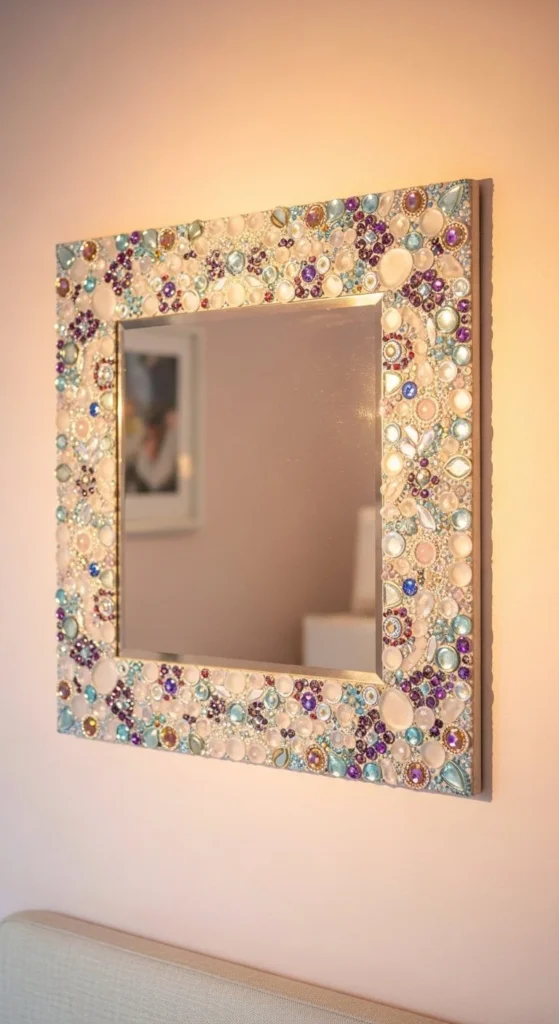
4. Framed Glam Accent Mirror with Beads
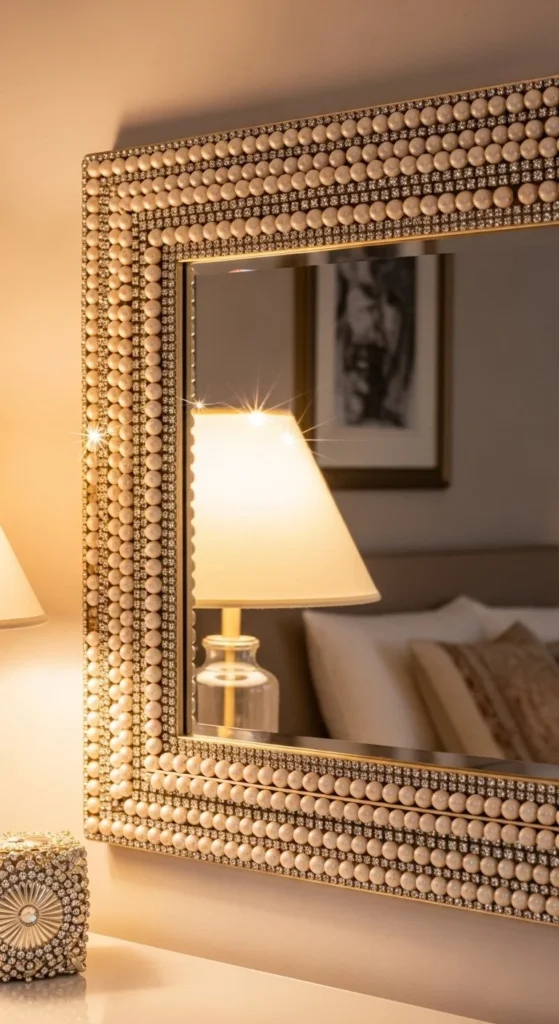
Beads and gems change everything. Start with an 8×10 beveled mirror for instant polish. Build outward using craft beads, rhinestone strips, or faux pearls. Layering is key. Flat trims first. Rounded pieces last. This creates depth without bulk.
Hot glue handles fast placement, but switch to stronger adhesive for the final layer. Once dry, touch up with metallic paint to unify finishes. Gold reads classic. Chrome feels bold. Black adds drama. Budget-friendly DIY doesn’t mean skipping detail. Small additions make the frame feel intentional.
This mirror works well on vanities, dressers, or as part of a glam gallery wall. Keep nearby decor minimal so the shine stands out. For content creators, this project shines in close-up shots and before-after reveals. It’s beginner-friendly and sells well as “under $10” inspiration.
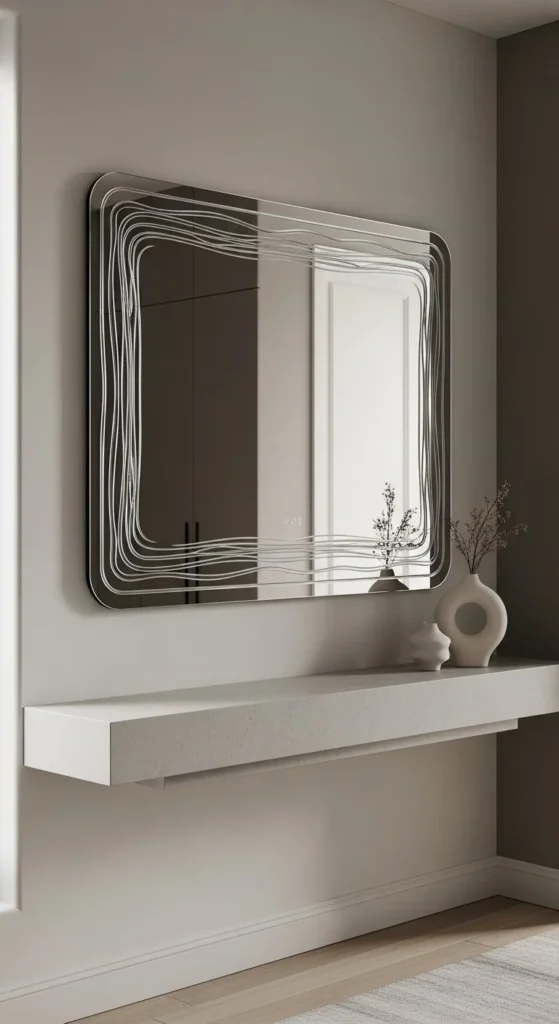
5. Oversized Statement Mirror Panel
Large mirrors often feel out of reach price-wise. This build flips that idea. Combine nine or more identical mirrors on a solid backing. Hardboard or thin plywood keeps the surface flat. Glue in rows. Check spacing constantly. Small shifts show at scale.
Once assembled, paint the perimeter edge to create a custom frame illusion. Let it lean against a wall for a relaxed look or hang it securely with sawtooth hooks. High-end looking results come from size and restraint, not ornament.
Place it in bedrooms, gyms, or dressing areas where reflection serves function too. Keep nearby colors muted so the mirror reads calm, not flashy. This project performs well in serialized content like “from tiny to statement piece” builds and pairs nicely with renter-safe hanging guides.
6. Minimalist Square Tile Accent Wall
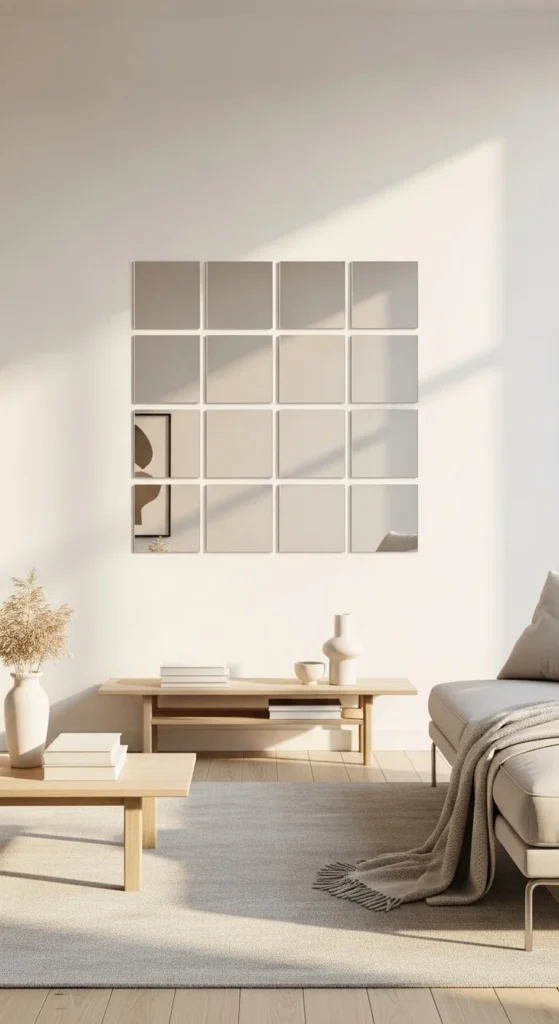
Square mirror tiles feel modern when spacing stays tight and intentional. Lay them out on the floor first. Decide your grid size before committing glue. A 3×3 or 4×4 layout reads balanced without overpowering the wall. Foam board works well for this size and keeps the build lightweight. Use a level between each row. Small errors multiply fast.
Once mounted, leave the edges raw for a gallery-style look or paint the backing edge in matte black for contrast. Gallery wall mirrors like this play well with neutral furniture and clean lines. Keep nearby decor simple. One plant. One sculptural object. That restraint keeps reflections crisp.
Budget option: mix Dollar Tree tiles with acrylic mirror sheets if stock runs low. From a distance, the difference disappears. This project suits renters and performs well in small spaces where light bounce matters more than size.
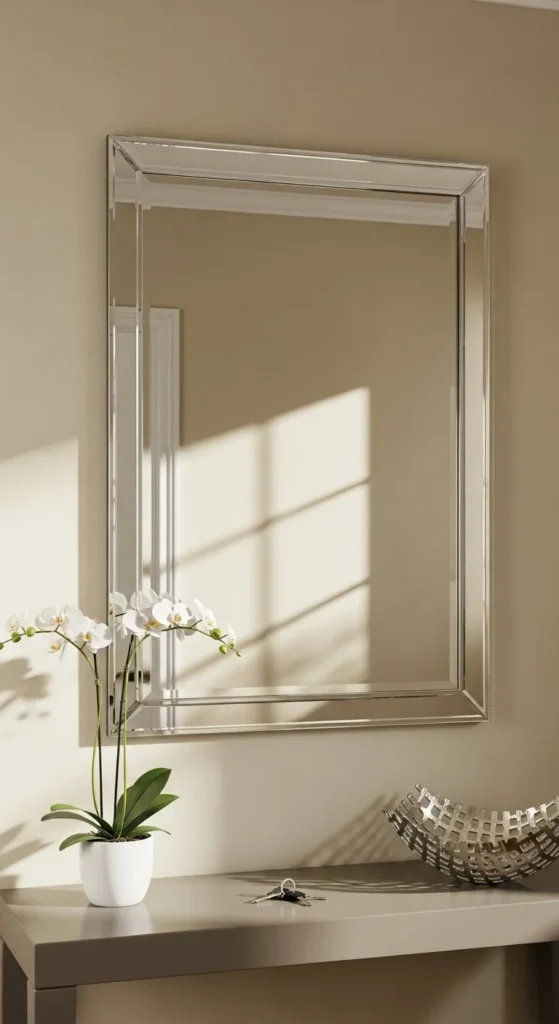
7. Round Glam Mirror with Spray-Painted Rim
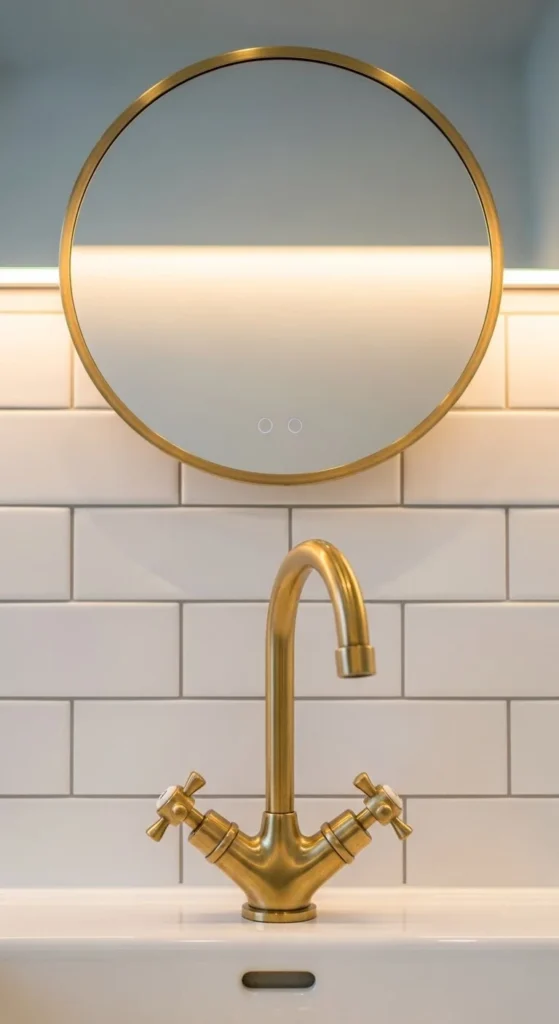
Sometimes the simplest change reads the most polished. Take a plain round mirror and spray paint the edge. Gold, silver, or chrome works. Tape the glass carefully and spray in light passes. Let it cure fully before hanging.
This trick adds contrast without bulk. Modern glam fans love this because it feels store-bought. Pair it with matching hardware for cohesion. If spray paint isn’t an option, liquid chrome markers offer control and less mess.
This mirror works well in bathrooms, vanity corners, or as part of a grouped wall display. Cost stays low. Time stays short. Results photograph cleanly for Pinterest pins and short-form video.
8. Gallery Wall Mirror Cluster
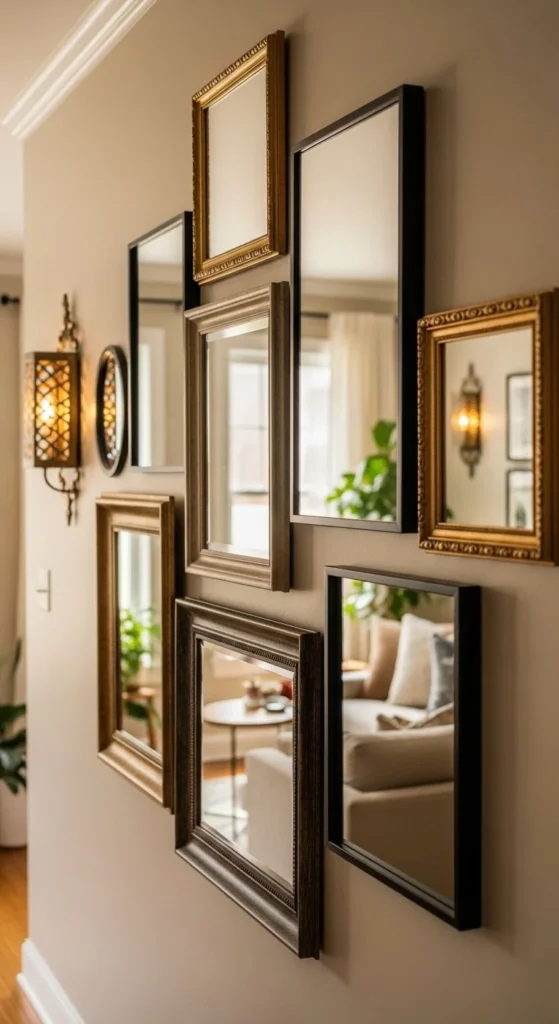
Clusters bring personality without symmetry rules. Mix square, round, and rectangular mirrors. Keep finishes within one color family so the wall feels cohesive. Lay everything out on the floor first. Take a photo. Adjust spacing before mounting.
Hot glue works for assembling custom pieces, but wall mounting benefits from Command hooks or sawtooth hangers depending on weight. Stunning wall decor here comes from variation, not perfection. Slight shifts make it feel collected over time.
This style fits narrow hallways and stair landings. Add one art print or small shelf to break reflection density. It’s a strong option for serialized content like “build your dream wall” tutorials.
9. Sunburst Jenga Block Mirror
Jenga blocks give sunburst designs sharper edges than spoons. Glue them in layers for depth. Start with four cardinal points, then fill gaps. Spray paint after assembly for a unified finish. Gold and black read dramatic. Natural wood reads mid-century.
Use a sturdy backing. Blocks add weight fast. Gorilla Glue handles stress better than hot glue alone. Budget-friendly DIY projects like this thrive on patience during layout. Spacing controls the final look.
Hang it where light hits from the side. Shadows enhance the radial pattern. This mirror works well above consoles or bar carts and photographs well in angled shots.
10. Faux Antique Distressed Mirror
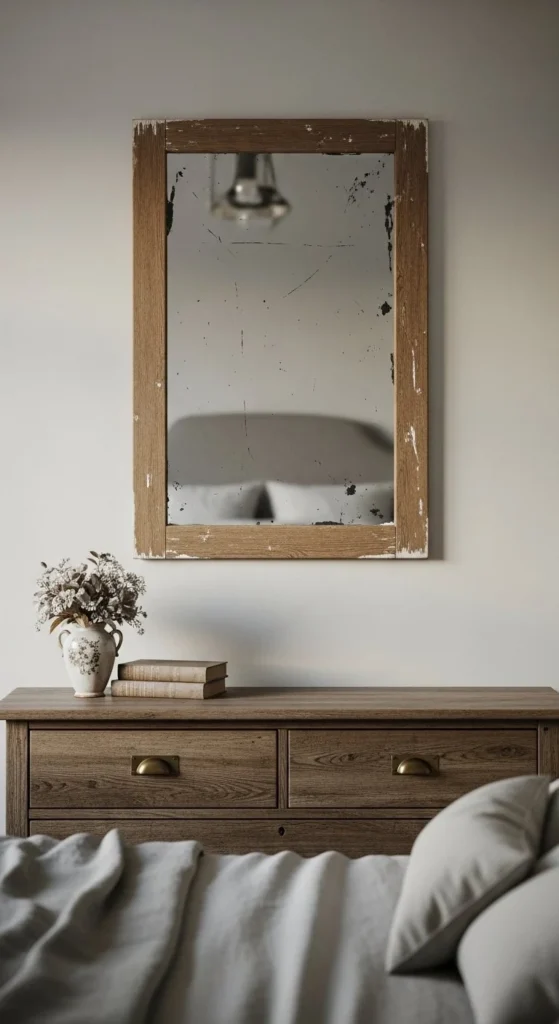
Antique-style mirrors bring softness to modern rooms. Lightly sand the edges of a basic mirror backing. Add a thin wash of diluted paint to the perimeter. Wipe back unevenly. Seal once dry. The center stays reflective while edges feel aged.
This approach pairs nicely with wood furniture and linen textures. It avoids heavy embellishment while still feeling intentional. High-end looking pieces often rely on subtle finishes like this.
Use it in bedrooms, dining spaces, or layered behind decor on shelves. The technique works on many mirror sizes and adapts well for seasonal refreshes.
11. Layered Rhinestone Vanity Mirror
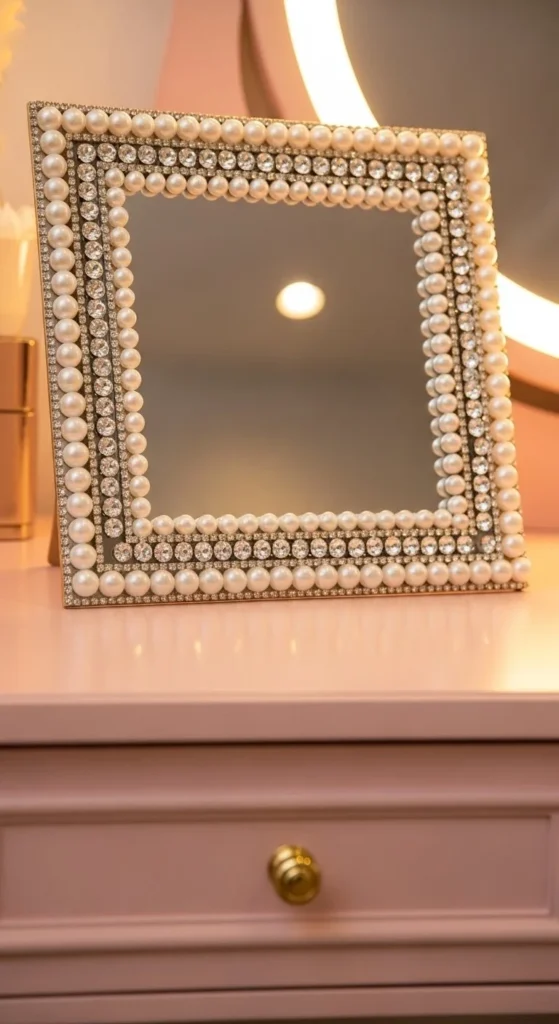
Rhinestones transform a plain mirror into a glam statement. Start by gluing a base layer of flat pearls, then alternate with rhinestone strips. Layering adds dimension without bulk. Hot glue works for placement, but finish with a stronger adhesive for longevity.
DIY tip: choose a single metallic theme—gold or silver—for a cohesive finish. Keep surrounding decor neutral so the sparkle pops. Budget-friendly DIY doesn’t mean skipping luxury cues; even tiny embellishments make a difference.
Perfect for bedrooms, dressing areas, or as part of a multi-mirror gallery. This technique pairs well with small bevel mirrors for a boutique feel. Photograph it with soft side lighting to highlight the shimmer.
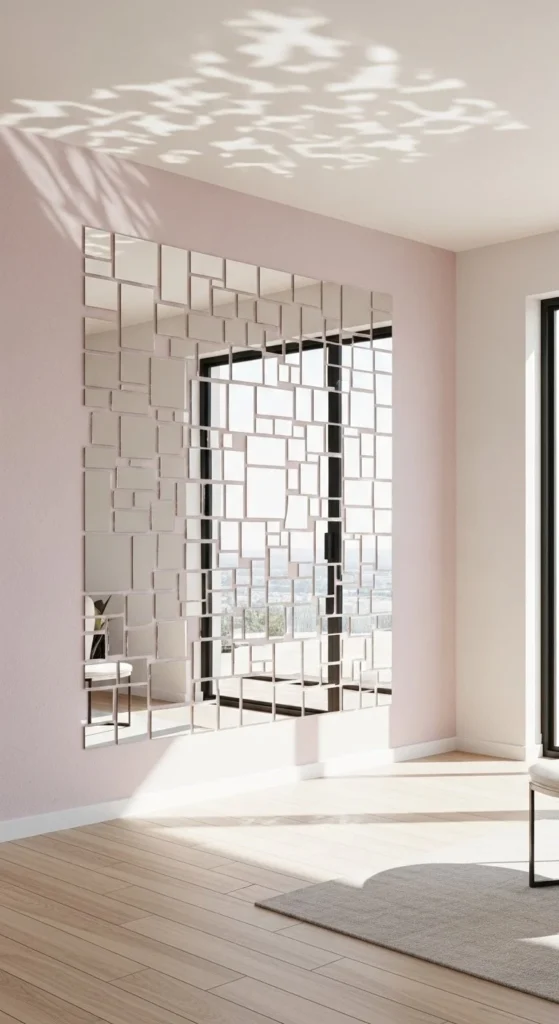
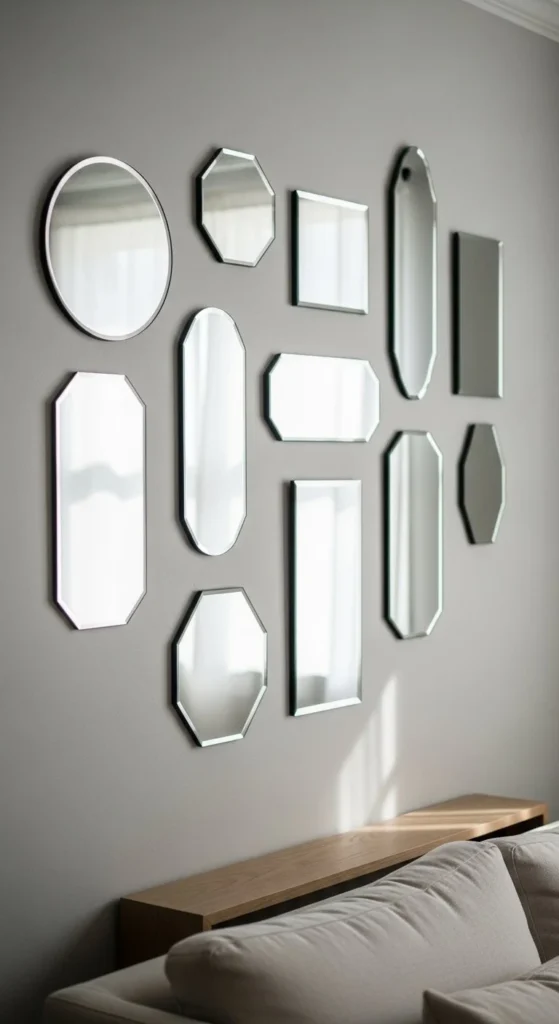
12. Multi-Shape Mirror Mosaic
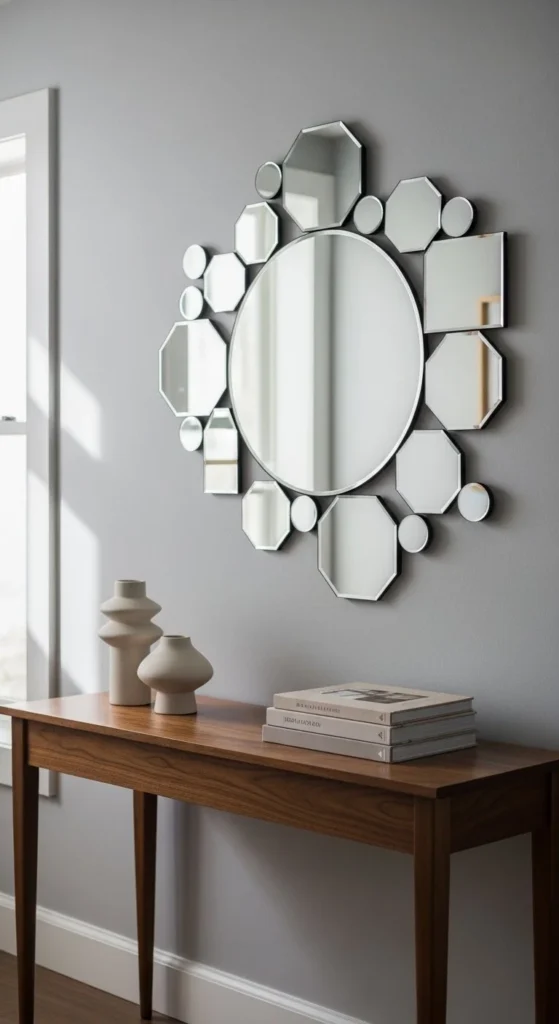
Mixing shapes adds interest to a wall without clutter. Start with a central round mirror, then build outward with squares and octagons. Tape the layout before gluing. Foam board is perfect for smaller mosaics; hardboard is better for larger clusters.
Hot glue is fast, but Gorilla Glue is more durable for heavier mirrors. Gallery wall hacks like this make small spaces appear larger. Keep the color palette minimal to let reflections shine.
This approach works in hallways, living rooms, or entryways. It scales easily, which is ideal for serialized tutorials. Small tweaks in mirror size or shape drastically change the mood.
13. Cordless Glue Gun Mirror Frame
Cordless glue guns simplify layered frame projects. Hot glue allows precise placement without cord clutter. Start by sketching your design directly on foam board. Add beads, small trim pieces, or even craft sticks.
Using a cordless HOTO glue gun under $20 makes assembling large or complex designs painless. Tools that make DIY foolproof reduce mistakes and speed workflow. Paint or spray the finished frame for uniformity.
This project works above desks, dressers, or small wall sections. The cordless setup is perfect for renters without a dedicated workspace. It also reduces mess, making cleanup easier for beginners.
14. Mirror with Chrome Trim Accents
Chrome accents add an unexpected luxury touch. Use chrome car trim or liquid chrome markers to outline edges. It’s inexpensive but reads high-end. Keep lines straight with painter’s tape for precision.
Use foam board or tempered hardboard for a smooth backing. Color-swap your mirrors in 5 minutes by adding metallic edges that complement existing decor. Chrome works especially well against soft neutrals or matte black walls.
Perfect for entryways, hallways, or bathrooms. Pair with minimal accessories so the shine doesn’t compete with decor. This trick works on both small and large mirrors for flexible styling.
15. Acrylic Tile Mosaic Mirror
Acrylic mirror tiles are a reliable backup when Dollar Tree stock runs out. They’re lightweight and self-adhesive. Random layouts add texture and visual interest. Use a level to keep edges flush.
Ideal for renters or large walls because tiles are easy to adjust. Combine with foam board backing for stability. When Dollar Tree sells out: dupes list style hacks keep projects on schedule. Paint surrounding wall edges to frame the mosaic neatly.
Perfect for bedrooms, small living rooms, or accent walls. Light hitting angled tiles creates playful reflections. Easy to swap or rearrange for seasonal changes without extra cost.
16. DIY Sunburst Mirror with Paint Stirrer Rays
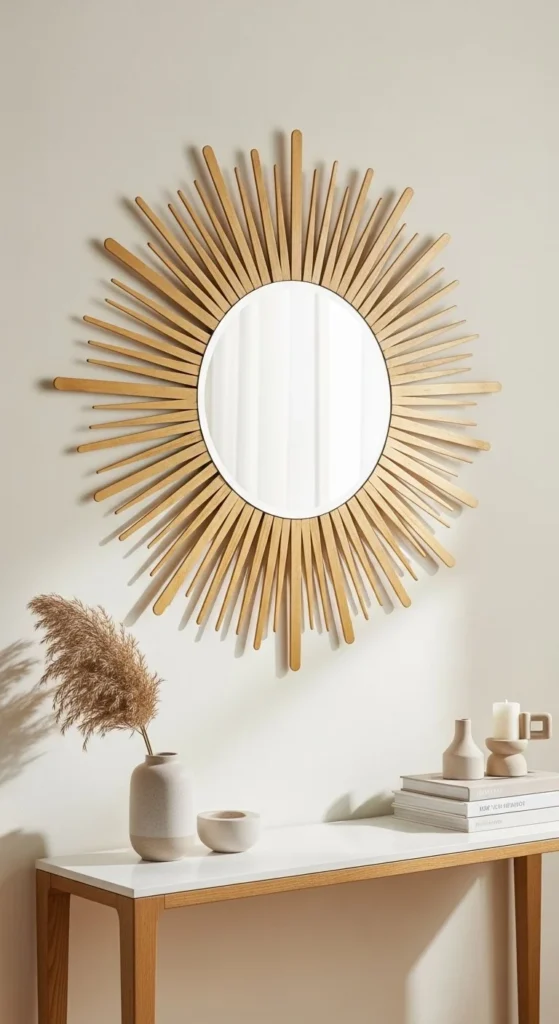
Paint stirrers create sharper sunburst rays than spoons. Cut them to various lengths for layered depth. Spray paint them before gluing to avoid mess on the mirror. Foam board is ideal for lighter builds; hardboard adds stability for larger projects.
Glue each piece in stages, starting with the longest rays at cardinal points. Sunburst style popular because it’s dramatic without being bulky. Add a touch of rhinestones or small beads at the base for sparkle if desired.
Place in entryways, living rooms, or bedrooms. Side lighting enhances shadows, creating dynamic visual interest. The budget stays low while the impact feels luxe, making it perfect for Pinterest-ready content.
17. Layered Beads and Flowers Mirror Frame
Layered embellishments make a mirror feel boutique-level. Start with a base of beads, then glue faux flowers on top in clusters. Mix sizes and shapes for dimension. Hot glue works for quick assembly; stronger adhesive is better for heavy layers.
Keep the surrounding wall neutral so the frame reads polished. Embellishment layering draws the eye without overwhelming space. This approach works for small mirrors or large gallery setups.
Perfect for bedrooms, powder rooms, or vanity areas. It also photographs beautifully for before-and-after videos. Rotate flower colors seasonally for a budget-friendly refresh that feels custom.
18. Multi-Mirror Grid Statement Piece
Scale matters for statement walls. Combine multiple identical mirrors on tempered hardboard for stability. Arrange in a perfect grid, measure carefully, and glue or secure each piece. Use a level to keep lines flush.
Large grids transform plain walls into high-end looking gallery features without breaking the bank. Paint the edges to simulate frames for a more finished look. Sawtooth hooks or Command strips keep it renter-friendly.
This works in living rooms, dining rooms, or as a bedroom focal point. Simple styling around it—like a bench, vase, or rug—keeps the focus on reflections. It also performs well in serialized “step-by-step builds” for DIY content.
19. DIY Edge-Painted Glam Mirror
Edge painting transforms a plain mirror into a polished piece. Mask the glass, then apply black, gold, or silver paint around the edge. Let it dry completely. Foam board backing helps with handling while painting.
Paint edging technique adds visual depth and mimics boutique framing. Small changes like this elevate cheap mirrors to luxe-feeling decor. Keep surrounding decor minimal to avoid visual noise.
Works well in hallways, bedrooms, or small living rooms. Try metallics for glam, black for modern chic, or white for subtle contrast. Quick, low-cost, and beginner-friendly—perfect for short-form tutorial content.
20. No-Drill Renter-Safe Hanging Mirror
Heavy mirrors can intimidate renters. Sawtooth hooks or Command strips make hanging simple without wall damage. Pre-measure placement and use a level to ensure alignment. Foam board backing keeps smaller mirrors light, while hardboard supports larger pieces.
Combine with foolproof grid checklist strategies for multiple mirrors. Hot glue or Gorilla Glue secures mirrors to backing, preventing sagging. This approach delivers budget-friendly DIY results with minimal stress.
Perfect for rental bedrooms, living rooms, or entryways. Keeps walls intact while giving high-impact reflective decor. Also ideal for small DIY bloggers demonstrating step-by-step tutorials that appeal to first-time crafters.
21. Mirror with Motion-Sensor LED Glow
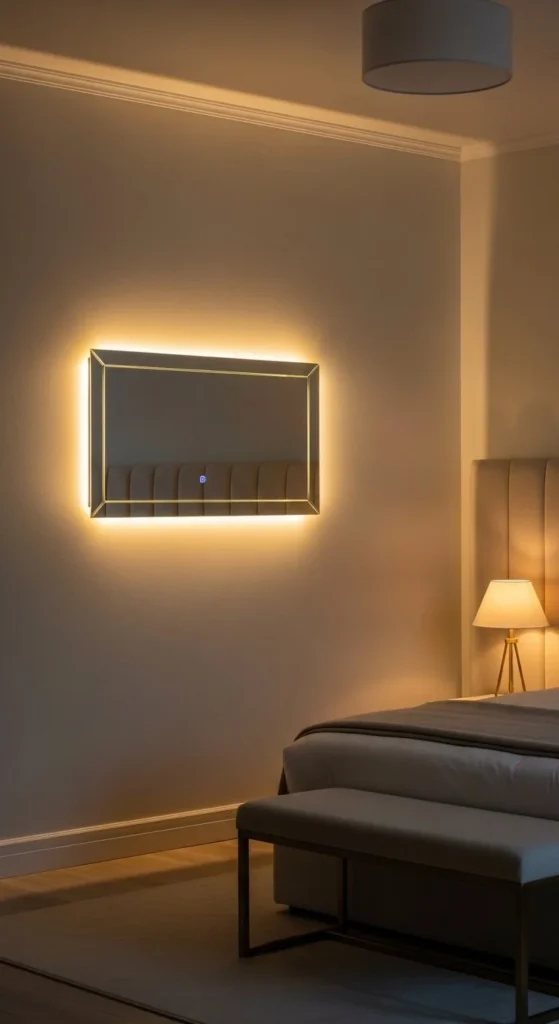
Add a glowing effect with motion-sensor LED pucks. Place the LEDs behind the mirror’s edge for a halo effect. Foam board backing works for small setups; hardboard is better for larger mirrors. Hot glue or double-sided tape keeps lights in place.
Motion-sensor LED integration turns a simple mirror into a statement piece. Works well in bedrooms, hallways, or powder rooms. For added impact, spray paint edges metallic first, then mount LEDs for an upscale look.
Budget tip: choose warm white LEDs for versatility. The glow creates depth and ambiance without additional lamps, giving a “luxury hotel” vibe on a tight budget. Perfect for YouTube tutorials highlighting tech-enhanced DIY decor.
22. Beveled Mirror with Gold Spray Rim
Gold spray paint instantly transforms a plain mirror. Mask the glass carefully to protect reflective surfaces. Light, even coats prevent drips and uneven coverage. Foam board or hardboard backing ensures stability while painting.
This color-swap your mirrors trick is fast, cheap, and visually striking. It pairs well with neutral walls and brass or gold accents in furniture. Hot glue or Gorilla Glue works for securing mirrors to backing for durability.
Perfect for small walls, desks, or vanities. The metallic edge reads high-end without expensive frames. Easy enough for beginners, and quick enough for content series showing multiple color variations.
23. DIY Acrylic Tile Sunburst Mirror
Acrylic tiles are lightweight and easy to work with. Arrange them radially around a central round mirror. Start with four cardinal points, then fill in gaps. Foam board backing keeps the pattern stable.
Sunburst style popular for budget DIY because it creates drama with inexpensive materials. Spray paint tiles metallic for more glam or leave them clear for subtle shine. Hot glue holds small tiles, but stronger adhesives are better for larger projects.
Ideal for living rooms, entryways, or accent walls. Natural light bouncing off the tiles enhances depth and movement, giving a custom look without high costs.
24. Layered Gem Mosaic Mirror
Layering gems creates texture and visual interest. Glue beads and acrylic pieces directly onto the backing around the mirror edges. Begin with larger pieces, then fill gaps with smaller accents.
This embellishment layering approach transforms a plain mirror into boutique-style decor. Hot glue is quick for placement, but consider stronger adhesive for longevity. Keep colors cohesive for a professional feel.
Perfect for bedrooms, vanity corners, or galleries. It works well in serialized DIY content, showing how simple layering creates a luxe effect on a budget.
25. DIY Chrome Liquid Accented Mirror
Chrome liquid accents add subtle shine and modern flair. Apply in thin lines using painter’s tape for precision. Let dry completely before hanging. Foam or hardboard backing ensures a straight, flat surface.
Chrome accents trendy for adding luxury cues without buying expensive frames. Pair with neutral walls and minimal decor to let shine stand out. Hot glue secures mirrors to backing without damage.
Works in entryways, bedrooms, or small living spaces. Easy to replicate in multiple mirrors for a gallery wall effect. Perfect for tutorials showcasing low-cost glam transformations.
26. DIY Renter-Safe Layered Gallery Wall
Gallery walls don’t need nails or drills. Use sawtooth hooks, Command strips, and foam board backing. Mix small mirrors in different shapes to create depth. Pre-layout on the floor before mounting.
Beginner-friendly claims hold true here: the wall looks curated and expensive while staying under $10 per piece. Layering and symmetry control visual balance. Use stronger adhesives for heavier mirrors and lighter ones for flexible arrangement.
Perfect for renters or short-term spaces. Works in hallways, bedrooms, or above desks. This technique pairs well with serialized tutorials showing step-by-step installation for multiple mirrors at once.

Leave a Reply