
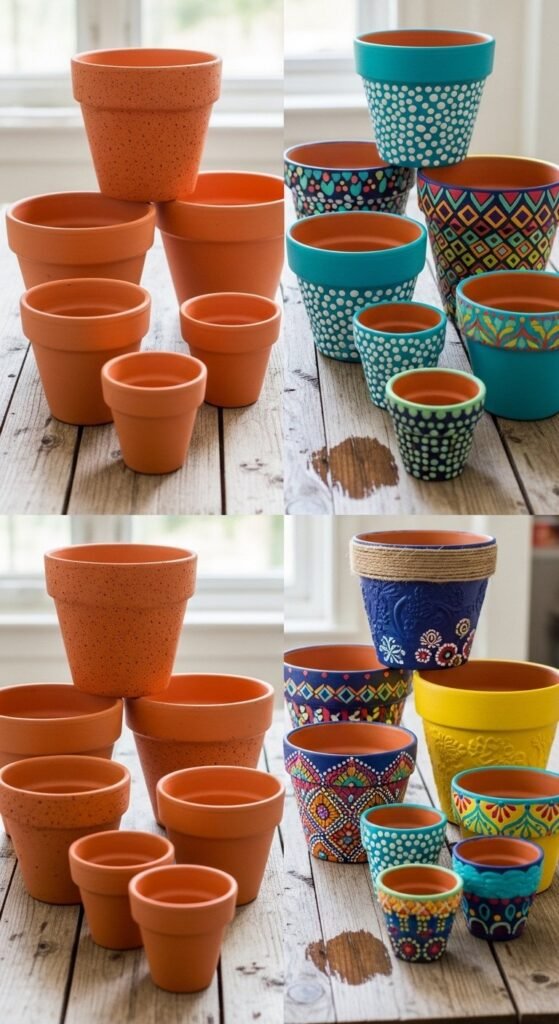
That dusty stack of plain terra cotta pots hiding in your garage? They’re not junk, they’re blank canvases. With a few simple supplies and a splash of creativity, you can turn inexpensive clay pots into stunning planters that look boutique-bought (for a fraction of the price).
Whether you love boho, modern, farmhouse, or whimsical styles, there’s a makeover idea waiting for you. Let’s transform those humble pots into décor pieces you’ll actually be proud to display.
Step 1: Prep Like a Pro (So Your Design Lasts)
Skipping prep is the fastest way to end up with peeling paint and disappointment. Luckily, this step is quick.
What to do:
- Brush off dust and loose debris
- Wipe pots with a damp cloth and let dry
- Lightly sand rough spots if needed
- Apply one thin coat of primer or gesso
Why this matters:
Terra cotta is porous, meaning it absorbs paint unevenly. Priming creates a smoother surface and better color payoff.
Optional upgrade:
Seal the inside of the pot too if you plan to use it outdoors this helps prevent moisture damage.
Step 2: Paint for Instant Color Pop
Paint is the easiest way to make a dramatic change. Acrylic craft paint works beautifully and comes in endless colors.
Beginner-friendly ideas:
- Solid bold colors
- Soft pastels
- Neutral beige, taupe, or gray
- Matte black with white accents
Quick tips:
- Use thin layers (2–3 coats beat one thick coat)
- Let each coat dry fully
- Paint rims a contrasting color for extra style
If you’re unsure about color combos, stick to a simple palette:
- White + gray
- Blush + gold
- Sage + cream
- Black + terracotta
Step 3: Add Pattern Without Stress
You don’t need advanced art skills to create eye-catching designs.
Easy pattern techniques:
- Painter’s tape for stripes and triangles
- Stencils for florals or mandalas
- Q-tips for polka dots
- Paint pens for doodles
Try this simple look:
- Paint the pot a base color
- Let dry
- Add dots in a second color using a Q-tip
- Seal
Patterns instantly elevate a pot from “basic” to “custom.”
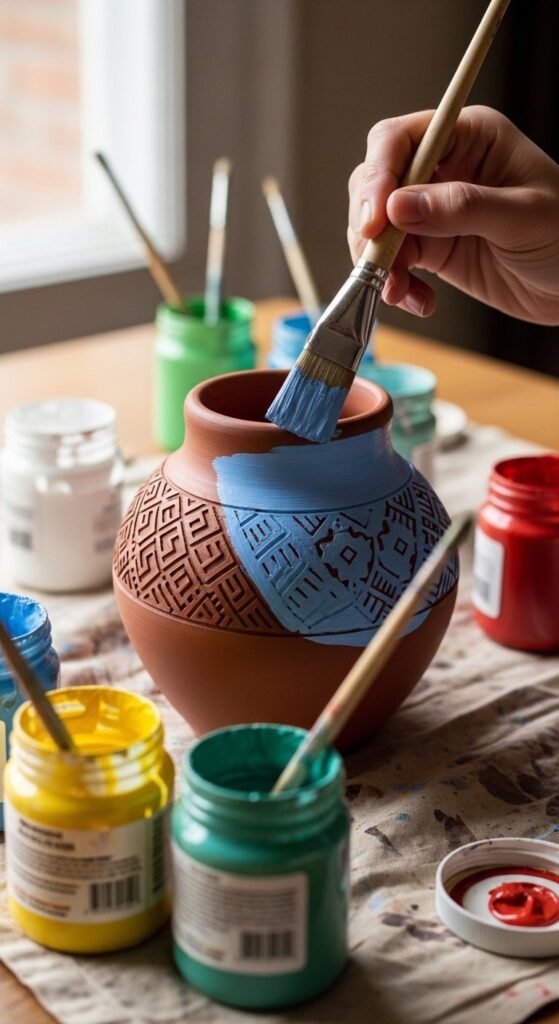
Step 4: Texture = Next-Level Makeover
Want something more than paint? Texture brings personality and depth.
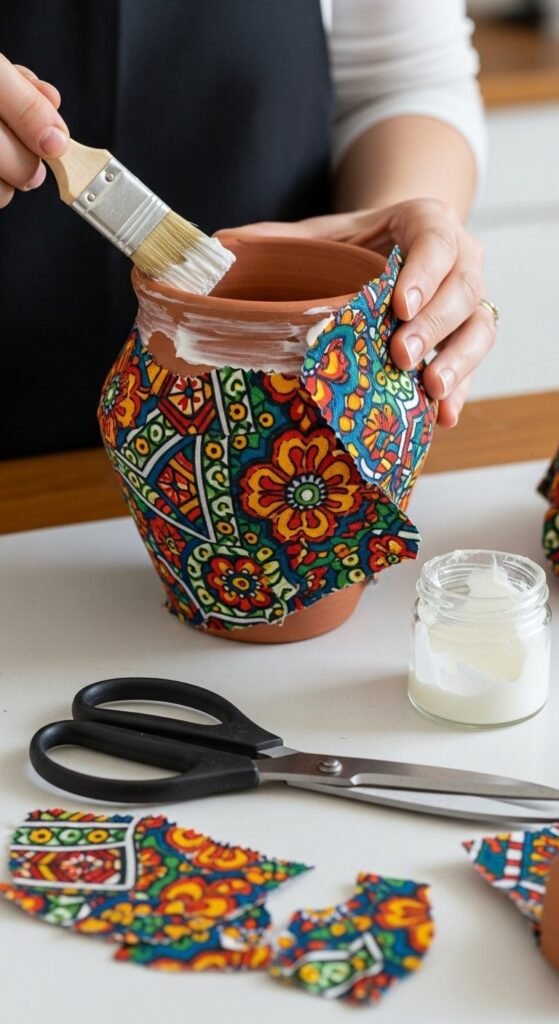
Fun texture ideas:
- Fabric wrapped around the pot with adhesive
- Yarn or twine coiled and glued
- Decoupage with napkins or scrapbook paper
- Raised designs made from air-dry clay
Fabric and yarn add cozy, boho vibes. Decoupage creates intricate patterns with almost no effort.
Pro tip:
Use a foam brush to smooth adhesive and remove air bubbles.
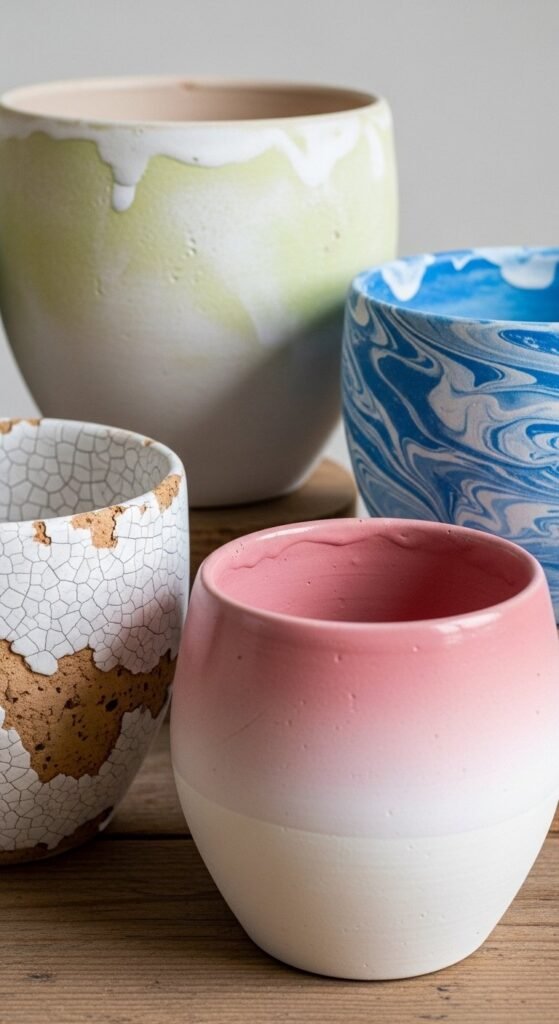
Step 5: Create Trendy Finishes
These techniques look high-end but are surprisingly easy.
Distressed / Vintage Look
- Paint pot a dark base
- Add lighter top coat
- Lightly sand edges
Limewashed Look
- Mix white paint with water
- Brush on thinly
- Wipe back with a cloth
Marble Effect
- Drip nail polish into water
- Swirl
- Dip pot quickly
Ombre Gradient
- Start dark at bottom
- Gradually blend lighter shades upward
Each finish gives a totally different personality to the same pot.
Step 6: Seal for Long-Lasting Beauty
Sealing protects your hard work, especially important for outdoor pots.
Choose:
- Matte sealer for rustic looks
- Gloss sealer for bold designs
- Outdoor-rated sealer for exterior use
Apply 1–2 thin coats and allow to cure fully before planting.
Step 7: Pair With the Right Plant
The right plant makes your makeover shine.
Easy pairings:
- Succulents → modern or geometric pots
- Ferns → neutral or textured pots
- Herbs → farmhouse or vintage pots
- Cacti → bold color or boho designs
Think of pot + plant as a styling duo.

Budget Tips
- Dollar-store pots work perfectly
- Use leftover paint from old projects
- Thrift stores often have cheap fabric and yarn
- One small bottle of sealer lasts many pots
Most projects cost under $5 per pot.
Common Mistakes to Avoid
- Skipping primer
- Using thick paint layers
- Not sealing for outdoor use
- Rushing drying time
Slow and thin always wins.
Bonus Ideas for Extra Fun
- Holiday-themed pots (pumpkins, snowmen, hearts)
- Kids’ character faces
- Gold leaf accents
- Stacked pots for vertical gardens
- Tiny 3D flowers or mushrooms
Once you start, it’s hard to stop!
Final Thoughts
Old clay pots don’t need to stay boring. With paint, texture, and a little imagination, you can turn them into statement pieces that brighten your home and garden.
Start with one pot… and don’t be surprised if you end up making ten.
Save this guide for later and start your clay pot makeover today! 🎨🌿

Leave a Reply